Collaborating
Overview
Teaching: 20 min
Exercises: 40 minQuestions
How can I make a contribution to other people’s repositories?
How do I know what changes other people are making in my repo?
Objectives
Explain what forks and pull requests (PR) are.
Open a PR to make a contribution to someone else’s repository.
Review a PR to check what changes have been made.
(Bonus) Update your fork to keep it up to date with the original repository.
Now that you have your repositories in GitHub, you will learn how to start collaborating with other people, contributing with content to their repositories and accepting other’s contributions to your own.
Forking someone else’s repository
- By default, a public repository can be seen by anyone but only the owner can make changes e.g. create new commits or branches.
forkinga repository means creating a copy of it in your own GitHub account.- This copy is fully under your control, and you can create branches, push new commits, etc., as you would do with any other of your repos.
forkis a GitHub concept and not Git.forksare related to the original repository, and the number of forks a given repository has can be seen in the upper right corner of the repo page.- If you have some changes in your fork that you want to contribute to the
original repo, you open a
pull request.
The image below shows that this repository has been forked 6 times already. To
fork it yourself, click on fork and choose your personal account.

Playing with a fork
Visit this repository and fork it. Explore the options in the repo. What’s different from a repository you created? And from the original one?
Solution
- The only visual difference with one of your repos is that there is a note just below the name indicating where this repo was forked from.
- You can also open a pull request (see below) across forks.
- In the original repo, you don’t have write access, i.e. you cannot modify any file or change any setting.
Pull requests
pull requests(or PRs, for short) are the GitHub method of contributing to other people’s repositories and keep track of changes made to your own.- As with
forks, PRs are a GitHub concept. - A
pull requestmeans: “Hey, I have some changes I would like to contribute to your repo. Please, have a look at them andpullthem into your own.” - You can open a PR from a branch in your repo to another branch in your own repo or the original repository it was forked from.
- Depending on the access settings, some branches might not allow to have PR
opened against them. These are
protectedbranches and are often associated to “stable” versions of the software contained in the repo. - In a repository with several collaborators, opening PR against branches in the same repo are the best method of letting them know of the changes you are introducing.
- The CONTRIBUTING file of the repository contains details on what information should be included in a PR to make it clear and effective.
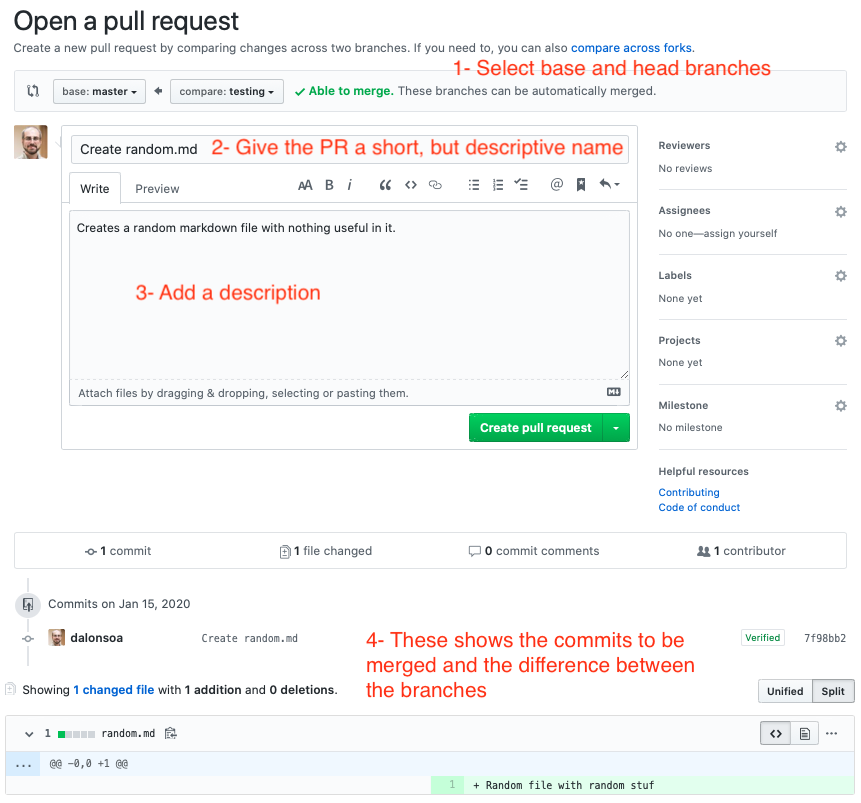
To open a PR, just click on the corrsponding button next to the branch selector, as shown in the next figure.

In the next screen, you can select the target branch (where things will be merged, if the PR is accepted) and the branch that you want to merge. You can open PR involving branches within the same repo or between a repo and any other fork of it. Once the branches are selected, a comparison between the files that are different will appear below.

Requesting reviewers
- When opening a PR, you can request it to be reviewed by someone else, so there is another pair of eyes making sure that your contribution is correct and does not introduce any bugs.
- Reviewers can just comment on the PR, approve it, or request changes before it can be approved.
- Some repositories might require the approval of one or more reviewers before the changes can be merged into the target branch.
- Only administrators of the target repository can merge PR.
Reviewing a PR
- When reviewing a PR, you will be shown, for each file changed, a comparison
between the old and the new version, much like
git diff(indeed, it isgit diffbetween the original and target branches, just nicely formatted). - You can add comments and suggest changes to specific lines in the code.
- Comments and suggestions must be constructive and help the code to become better. Comments of the type “this can be done better” are discouraged. The CONTRIBUTING or the CODE_OF_CONDUCT files often contain information on how to make a good review.
Issues
- Issues are another feature of GitHub, used to report bugs, request features or enhancements, or to discuss implementation details of some parts of the code.
- Issues are a kind of TODO list, with pending and completed tasks as well as serving to prioritise the development activity.
- Labels can be added to the issues by the repository administrator to inform at a first glance what the issue is about. Typical labels are “bug”, “enhancement”, “low priority” or “good first issue”, for example.
- Issues also can have one or more people assigned to them who will take care of sorting them out and closing them when done or if no longer relevant.
- By default any GitHub user can create an issue in a public repository
Mentioning other issues and PR
All issues and PR receive a tag number starting at 1 and preceded by #, like #40 or #110. If you want to refer to an issue or PR in any comment anywhere in GitHub, just use its tag number and these will be automatically linked from the comment.
Claim issues
There are some restrictions on who can be assigned to an issue. If you do not have write access to the repository (which is often the case) and you are not part of the same organisation of the repository, the only way of being assigned to an Issue is by making a comment on the Issue. This also serves to warn others that you are volunteering to work on that. A “Hey, I can tackle this.” is often enough.
Closing issues
If a PR tackles a particular issue, you can automatically close that issue when the PR is merged by indicating
Close #ISSUE_NUMBERin any commit message of the PR or in a comment within the PR.
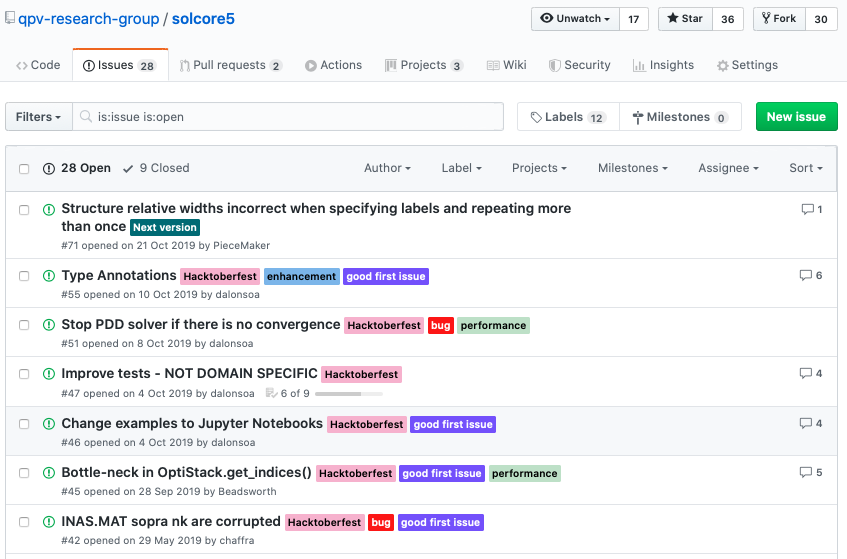
The following figure shows some of the issues open in a certain repository. The labels tell us there are a couple of bug reports, a couple of issues related to the performance of the software and several ones that are simple enough to be tackled by novice people. Most of them have some discussion going on.
To open a new issue, simply click on the New Issue green button on the right.

An example workflow
We now have all of the components needed to start working collaboratively through GitHub. A typical workflow might look like this:
- You discover a cool looking project on GitHub. You decide you want to help out
and browse through the
issues. You find one you think you can help out with. - You
forkthe project to your own GitHub account. - You
clonethe project from your fork to your local machine. - You create a new branch with
git branch issue_fixand check it out withgit checkout issue_fix - You make the changes to the code, creating several commits in the process
- You push the new commits in the
issue_fixbranch to your remote copy of the project withgit push -u origin issue_fix - On GitHub you create a
Pull Requestmerging your new branch into main of the original project. - The project owner reviews your Pull Request and asks for some changes.
- You make the changes in your local copy of the
issue_fixbranch and usegit pushto update your remote fork with the new commits. This automatically updates your Pull Request. - Your Pull Request is approved and accepted, the
issue_fixbranch is added to the original repository and a merge commit is created incorporating your changes. - Job done! You can delete your fork on GitHub if you want.
If there is a group of you that will be working together on a project you can avoid needing to have individual forks by setting up collaborators. This allows you to grant write access to other users to a public or private repository. In this case we still strongly recommend working in separate branches and communicating through issues and pull requests.
Making a book of recipes
Together with some colleagues, you are writing a book of recipes for sauces and you are using git for version control and GitHub to collaborate in the writing of the book.
Form groups of 3-4 people and choose one to act as administrator. This person should:
- Fork the Book of Recipes repository with the skeleton of the book.
- Pass the link to the repo to your colleagues.
Enabling issues in forks
By default, when you fork a repository, Issues are disabled. To enable them go to
Settingsin the upper right corner, then toOptionsin the left panel and, finally, scroll down to theFeaturessection. There click the Issues tickbox to enable them.Now, start collaborating!
- All, including the administrator, open new issues with recipes for sauces you will like to have in the book.
- Administrator, add some tags, prioritising some of the recipes, and assign yourself or one of your colleagues as responsible for each of them. Remember you will need to “Claim the Issue” first in order to be assigned to it, as discussed above.
- Fork the administrator’s repository. Administrator, did you notice how the number of forks increases? Which GitHub users forked it from you? And from the original repo?
- Work on the recipes you have been assigned. Practice the concepts learnt in previous episodes about cloning a repository, making the changes locally and pushing those changes back to the remote repository. You can even try a gitflow aproach if you feel ambitious!
- When ready, open a PR to the administrator’s repo and request his/her review.
- Administrator, review the PR, request some changes and accept others. When ready, merge the PR.
These exercises can be repeated with the other members of the group acting now as administrators and choosing a different topic for the recipes (eg . pasta, roasts, cocktails, etc.).
Bonus: Keeping your fork sync with the original repo
In the previous exercise, the individual forks will be outdated as you contribute with content to the administrator’s repo. Follow these instructions to make sure that your own forks are kept up to date.
Key Points
Forks and pull requests are GitHub concepts, not git.
Pull request can be opened to branches on your own repository or any other fork.
Some branches are restricted, meaning that PR cannot be open against them.
Merging a PR does not delete the original branch, just modifies the target one.
PR are often created to solve specific issues.