Why use a Version Control System?
Overview
Teaching: 10 min
Exercises: 0 minQuestions
What is version control software?
Why should I use it?
Objectives
Explain what version control software does
Describe the advantages of using version control
State that Git is an example of version control softwares
The Essence of Version Control
- A system for managing your work (not necessarily just code) which records snapshots of the current state of a set of files
- Provides a historical record for your project
- Reports “diffs” that describe the file changes between snapshots
- Implements branching:
- Allows working on several different features at the same time and switching between them whilst also maintaining a working copy of the code
- Different people can work on the same code/project without interfering with each other
- You can experiment with an idea and discard it if it turns out to be bad
- Implements merging:
- The opposite of branching
- Combines different branches together
What Can Go Wrong Without Version Control
Consider the following directory listing. This is a common situation that can occur when working without version control (in fact it’s probably the best case scenario).
mylib-1.2.4_18.3.07.tgz         somecode_CP_10.8.07.tgz
mylib-1.2.4_27.7.07.tgz         somecode_CP_17.5.07.tgz
mylib-1.2.4_29.4.08.tgz         somecode_CP_23.8.07_final.tgz
mylib-1.2.4_6.10.07.tgz         somecode_CP_24.5.07.tgz
mylib-1.2.5_23.4.08.tgz         somecode_CP_25.5.07.tgz
mylib-1.2.5_25.5.07.tgz         somecode_CP_29.5.07.tgz
mylib-1.2.5_6.6.07.tgz          somecode_CP_30.5.07.tgz
mylib-1.2.5_bexc.tgz            somecode_CP_6.10.07.tgz
mylib-1.2.5_d0.tgz              somecode_CP_6.6.07.tgz
mylib-1.3.0_4.4.08.tgz          somecode_CP_8.6.07.tgz
mylib-1.3.1_4.4.08.tgz          somecode_KT.tgz
mylib-1.3.2_22.4.08.tgz         somecode_PI1_2007.tgz
mylib-1.3.2_4.4.08.tgz          somecode_PI_2007.tgz
mylib-1.3.2_5.4.08.tgz          somecode_PI2_2007.tgz
mylib-1.3.3_1.5.08.tgz          somecode_PI_CP_18.3.07.tgz
mylib-1.3.3_20.5.08.tgz         somecode_11.5.08.tgz
mylib-1.3.3_tstrm_27.6.08.tgz   somecode_15.4.08.tgz
mylib-1.3.3_wk_10.8.08.tgz      somecode_17.6.09_unfinished.tgz
mylib-1.3.3_wk_11.8.08.tgz      somecode_19.7.09.tgz
mylib-1.3.3_wk_13.8.08.tgz      somecode-20.7.09.tgz
...
The trouble with this way of working:
- Lots of manual work to manage these files
- Names are uninformative
- Not clear which versions of mylib and somecode are compatible
- Difficult to find changes between versions
Mistakes Happen
Without recorded snapshots you cannot:
- Undo mistakes and go back to a working version of your code
- Find out when a mistake was made and which results it may affect
- You might not even be able to tell what your mistake was (“It was working yesterday…“)
Working on different things
- For example new features and bug fixes, but you also want to use the current code for ongoing analysis
- Usually leads to multiple different copies of the code
- Copies need to be combined back together - but this often doesn’t happen
Collaboration
- “I will just finish my work and then you can start with your changes.”
- “Can you please send me the latest version?”
- “Where is the latest version?”
- “Which version are you using?”
- “Which version have the authors used in the paper I am trying to reproduce?”
Reproducibility
- How do you indicate which version of your code you have used in your paper?
- When you find a bug, how do you know when precisely this bug was introduced (are published results affected? do you need to inform collaborators or users of your code?).
What about Dropbox or Google Drive?
Using a system like this solves some but not all of the issues above:
- Document/code is in one place, no need to email snapshots.
- How can you use an old version? Possible to get old versions but in a much less useful way - snapshots of files, not directories.
- What if you want to work on multiple versions at the same time? Do you make a copy? How do you merge copies?
- What if you don’t have internet?
Git - A Version Control System
The materials of this course focus on teaching the version control software (VCS) Git. Whilst there are many different implementations of VCS, Git has become established as by far the most widely used. We focus on use of Git via its command line interface as we believe this is the best way to communicate the important fundamental concepts.
Git is a very powerful tool. Unfortunately it is also quite difficult to start using. Git often uses confusing and unintuitive terminology and the benefits of its use are often only apparent in the longer term. Today we will make every effort to demystify Git and make clear why it’s usage is an essential part of any programming activity.
"It's called a merge commit, Marty! It's a directed acyclic graph! We need to bisect and revert, and then use interactive rebasing possibly with a cherry-pick. What aren't you getting about this!?" pic.twitter.com/zahjHhiB33
— Gabriel Lebec (@g_lebec) October 2, 2020
These materials are written in the style of The Carpentries. If attending an instance of this workshop you are fully encouraged to “type along” with the instructor in order to be able to complete the exercises.
Key Points
Version control software refers to a type of program that records sets of changes made to files
VCS is a ubiquitous tool for software development
Tracking changes makes it easier to maintain neat and functional code
Tracking changes aids scientific reproducibility by providing a mechanism to recreate a particular state of your code base
VCS provides a viable mechanism for 100’s of people to work on the same set of files
VCS lets you undo mistakes and restore a code base to a previous working state
Git is the most widely used version control software
Using Git allows access to online tools for publication and collaboration
Committing and History
Overview
Teaching: 30 min
Exercises: 20 minQuestions
How do I start a project using Git?
How do I record changes made in a project?
How do I view the history of a project?
How can I correct mistakes I make with Git?
Objectives
Explain how and why Git must be configured
Explain what a repository is
List the commands used to create a Git commit
Describe the difference between the working directory, staging area and index
Use a commit history to find information about a repository
List the commands that can be used to undo previous commits
Explain potential issues with rewriting the commit history
First Things First
You should have already completed the setup instructions for this workshop and have Git installed. Launch a command line environment (in Windows launch “Git Bash” from the Start Menu, on Linux or Mac start a new Terminal). We will use this command line interface throughout these materials. We focus on teaching Git with the command line as we believe this is the most thorough and portable way to communicate the underlying concepts.
You can use the command line to interact with Git but there is still some extra
information you must provide before it is ready to use. Enter the below commands
using your relevant personal information as required (don’t type the $).
$ git config --global user.name "FIRST_NAME LAST_NAME"
$ git config --global user.email "email@example.com"
The information provided here will be included with every snapshot you record
with Git. In collaborative projects this is used to distinguish who has made
what changes. The --global part of the command sets this information for
any projects on which you might work on this computer. Therefore you only need
to perform the above commands once for each new computer Git is installed on.
The Command Line Interface
For users not generally familiar with using command line interfaces its worth taking a moment to consider the commands that were just run. To understand what we just did lets break down the first command:
git
- This simply indicates to the command line that we want to something with Git.
- All commands that we use today will start with this.
config
- Git is a very powerful tool with lots of functionality so next we need to indicate what we want to do with it.
- Putting
configindicates we want to change something about how Git is configured.--global
- Parts that start with dashes are called flags and are used to fine tune the behaviour of the command given.
- The role of the
--globalflag is explained above.user.name "FIRST_NAME LAST_NAME"
- Finally we tell Git what we want to configure and the details to use.
Creating a Repository
Warning for Linux and MacOS users!
Before you move onto this exercise, you should run the following command:
$ git config --global core.autocrlf inputThis will stop git recording changes to line endings, which can – depending on which text editor you’re using – result in git erroneously thinking every line in a file has changed.
For a longer explanation of why this may be needed, see GitHub’s comprehensive explanation here.
Now that Git is ready to use lets see how to start using it with a new project. In Git terminology a project is called a repository (frequently shortened to repo).
For this workshop you were provided with a zip file. If
you have not already, please download it and place it in your home
directory. The zip file contains a directory called recipe which in turn
contains 2 files - instructions.md and ingredients.md. This is the project
we’ll be working with, whilst not based on code this recipe for guacamole is an
intuitive example to illustrate the functionality of Git. To extract the archive run the below command:
$ unzip recipe.zip
Then change the working directory of the terminal the newly created recipe
directory:
$ cd recipe
You’ll need to repeat cd recipe if you open a new command line interface. Feel
free to open ingredients.md and instructions.md and take a look at them (use
a normal file browser if you’re not comfortable doing this on the command
line). Files with a .md extension are using a format called Markdown, don’t
worry about this now, for our immediate purposes these are just text files. Use
of Markdown and Github will come up in the next session however.
To start using Git with our recipe we need to create a repository for it. Make
sure the current working directory for your terminal is recipe and run:
$ git init
Initialized empty Git repository in /home/username/recipe/.git/
The path you see in the output will vary depending on your operating system.
masterandmainbranchesTraditionally, the default branch name whenever you
inita repository wasmaster. However, the sensitivity of the online community has shifted lately and some tools, like GitHub, use nowmainas the default name instead. You can read the rationale in this link.If you are using
gitverison 2.28 or higher (you can find the version you are using withgit --version) you can change the default branch name for all new repositories with:$ git config --global init.defaultBranch mainFor existing repositories or if your git version is lower tha 2.28, you can create the
masterbranch normally and then re-name it with:$ git branch -m master mainDepending on you exact version of git, you might get an error like the following when trying to rename the branch:
error:: refname refs/heads/master not found
fatal: Branch rename failed
If that is your case, make sure there are not uncommitted files in the repository, and that you have made at least one commit (see below for more information about commits). Ultimately, you can simply create a separate branch called
mainand use that one as your default branch rather thanmaster, which you can then delete.We will use
mainas the default branch name throught the workshop.
Creating The First Snapshot
Before we do anything else run the below:
$ git status
On branch main

No commits yet

Untracked files:
  (use "git add <file>..." to include in what will be committed)

	ingredients.md
	instructions.md

nothing added to commit but untracked files present (use "git add" to track)
This is a very useful command that we will use a lot. It should be your first point of call to figure out the current state of a repository and often suggests commands that can be used for different tasks.
Don’t worry about all the output for now, the important bit is that the 2 files we already have are untracked in the repository (directory). We want to add the files to the list of files tracked by Git. Git does not track any files automatically and you need make a conscious decision to add a file. Let’s do what Git hints at:
$ git add ingredients.md
$ git add instructions.md
$ git status
On branch main

No commits yet

Changes to be committed:
  (use "git rm --cached <file>..." to unstage)

	new file:   ingredients.md
	new file:   instructions.md
Now this change is staged and ready to be committed (note that we could
have saved some typing here with the command git add ingredients.md
instructions.md).
Let us now commit the change to the repository:
$ git commit -m "adding ingredients and instructions"

[main (root-commit) aa243ea] adding ingredients and instructions
 2 files changed, 8 insertions(+)
 create mode 100644 ingredients.md
 create mode 100644 instructions.md
We have now finished creating the first snapshot in the repository. Named after the command we just used, a snapshot is usually referred to in Git as a commit, or sometimes a changeset. We will use the term commit from now on. Straight away query the status to get this useful command into our muscle memory:
$ git status
On branch main
nothing to commit, working tree clean
The output we get now is very minimal. This highlights an important point about the status command - it’s purpose is to report on changes in the repository relative to the last commit. In order to see the commits made in a project we can use:
$ git log
commit b7cd5f6ff57968a7782ff8e74cc9921cc7463c30 (HEAD -> main)
Author: Christopher Cave-Ayland <c.cave-ayland@imperial.ac.uk>
Date:   Mon Dec 30 12:51:04 2019 +0000

    adding ingredients and instructions
We’ll talk in more detail about the output here but for now the main point is to recognise that a commit has been created with your personal information and the message you specified.
Staging and Committing
For our first commit we saw that this is a two step process - first we use git
add then git commit. This is an important pattern used by Git. To understand
this in more detail it’s useful to know that git has three ‘areas’.
- The Working Directory (or Working Tree)
- This is the copy of the files that you actually work with in a normal way.
- The Staging Area (or index)
- When you run
git adda copy of a file is taken from the working tree and placed here. - New (untracked) files must be added to the staging area before git will track them.
- If a tracked file has been changed it must be added to staging area for that change to be included in a commit.
- This is known as staging files or adding them to the staging area.
- Only files in the staging area are included in a commit.
- When you run
- The Repository
- When you run
git commita new commit is created in the repository. - All files in the staging area are moved to the repository as part of the new commit.
- When you run
The relationship between the commands we’ve seen so far and the different areas
of Git are show below:

Exercise: Create some more commits
Add “1/2 onion” to
ingredients.mdand also the instruction “enjoy!” toinstructions.md. Do not stage the changes yet.When you are done editing the files, try:
$ git diffThere’s lots of information here so take some time to understand the output. If your output doesn’t contain colours you may want to run
git diff --color.First, practice what we have just seen by staging and committing the changes to
instructions.md. Remember to include an informative commit message.Now, run
git statusandgit diff. Then, stage and commit the changes toingredients.mdbut, after each step rungit status,git diffandgit diff --staged. What is the difference between the two diff commands? How does running staging and committing change the status of a file?
Why stage?
The last exercises highlights the reason Git use a staging area before making commits. You can make file changes as you want all at once and then group them together logically to make individual commits. We’ll see why having only sets of related changes for a specific purpose in a single commit is so useful later on.
Git History and Log
We used git log previously to see the first commit we created. Let’s run it
again now.
$ git log
commit b6ff1ca61f08241ec741f6fc58ab2a443a253d89 (HEAD -> main)
Author: Christopher Cave-Ayland <c.cave-ayland@imperial.ac.uk>
Date:   Tue Dec 31 12:32:04 2019 +0000

    Added 1/2 onion to ingredients

commit 2bf7ece2f57594873678f9c17832010730970b28
Author: Christopher Cave-Ayland <c.cave-ayland@imperial.ac.uk>
Date:   Tue Dec 31 12:28:19 2019 +0000

    Added instruction to enjoy

commit ae3255af37e82a98c57f16a057acd1ad5a15ff28
Author: Christopher Cave-Ayland <c.cave-ayland@imperial.ac.uk>
Date:   Tue Dec 31 12:27:14 2019 +0000

    Adding ingredients and instructions
Your output will differ from the above not only in the date and author fields but in the alphanumeric sequence (hash) at the start of each commit.
- We can browse the development and access each state that we have committed.
- The long hashes following the word commit are random and uniquely label a state of the code.
- Hashes are used when comparing versions and going back in time.
- If the first characters of the hash are unique it is not necessary to type the entire hash.
- Output is in reverse chronological order, i.e. newest commits on top.
- Notice the label HEAD at the top, this indicates the commit that the current working directory is based on.
What is a commit hash?
A commit hash is a string that uniquely identifies a specific commit. They are the really long list of numbers and letters that you can see in the output above after the word
commit. For example,ae3255af37e82a98c57f16a057acd1ad5a15ff28for the last entry.Ocasionally, you will need to refer to a specific commit using the hash. Normally, you can use just the first 5 or 6 elements of the hash (eg. for the hash above it will be enough to use
ae3255a) as it is very unlikely that there will be two commit hashes with identical starting elements.Throughout this course, we will indicate that you need to use the hash with
[commit-hash]. On those occasions, replace the whole string (including the square brackets!) with the hash id. For example, if you need to usegit show(see example below) with the above commit hash, you will run:$ git show ae3255a
Exercise: Recalling the changes for a commit
The command
git logshows us the metadata for a commit but to see the file changes recorded in a commit you can usegit show:$ git show [commit-hash]Use one of the commit hashes from your Git history. To see the contents from when the commit was made try:
$ git show [commit-hash]:ingredients.md
To Err is Human, To Revert Divine
Rewriting History
A very common and frustrating occurrence when using Git is making a commit and then realising you forgot to stage something, or staged something you shouldn’t have. Fortunately the Git commit history is not set in stone and can be changed.
To undo the most recent commit you can use:
$ git reset --soft HEAD^
Follow this up with:
$ git log
commit 2bf7ece2f57594873678f9c17832010730970b28 (HEAD -> main)
Author: Christopher Cave-Ayland <c.cave-ayland@imperial.ac.uk>
Date:   Tue Dec 31 12:28:19 2019 +0000

    Added instruction to enjoy

commit ae3255af37e82a98c57f16a057acd1ad5a15ff28
Author: Christopher Cave-Ayland <c.cave-ayland@imperial.ac.uk>
Date:   Tue Dec 31 12:27:14 2019 +0000

    Adding ingredients and instructions
Notice we’ve gone from three commits to two. Let’s also run:
$ git status
On branch main
Changes to be committed:
  (use "git restore --staged <file>..." to unstage)
	modified:   ingredients.md
This shows that the content which was part of the commit has been moved back into the staging area.
From here we can choose what to do. We could stage some additional changes and create a new commit, or we could unstage ingredients.md and do something else entirely. For now lets just restore the commit we removed by committing again:
$ git commit -m "Added 1/2 onion to ingredients"
Changing History Can Have Unexpected Consequences
Using
git resetto remove a commit is only a good idea if you have not shared it yet with other people. If you make a commit and share it on GitHub or with a colleague by other means then removing that commit from your Git history will cause inconsistencies that may be difficult to resolve later. We only recommend this approach for commits that are only in your local working copy of a repository.
Reversing a Commit
Sometimes after making a commit we later (sometimes multiple commits later) realise that it was misguided and should not have been included. For instance, it’s a bit of cliche to tell people to “enjoy” at the end of a recipe, so lets get rid of it with:
$ git revert --no-edit [commit-hash]
[main a70e1c5] Revert "Added instruction to enjoy"
 Date: Tue Dec 31 12:37:47 2019 +0000
 1 file changed, 1 deletion(-)
Check the contents of instructions.md and you should see that the enjoy
instruction is gone. To fully understand what revert is doing check out the
repository history:
$ git log
commit ddef60e05eae3cc73ea5be3f98df6ae372e43750 (HEAD -> main)
Author: Christopher Cave-Ayland <c.cave-ayland@imperial.ac.uk>
Date:   Tue Dec 31 14:55:52 2019 +0000

    Revert "Added instruction to enjoy"

    This reverts commit 2bf7ece2f57594873678f9c17832010730970b28.

...
Using git revert has added a new commit which reverses the changes made in the
specified commit.
This is a good example of why making seperate commits for each change is a good
idea. If we had committed the changes to both ingredients.md and
instructions.md at once we would not have been able to revert just the enjoy
instruction.
The Ultimate Guide to Undoing in Git
It can be quite easy to get into a messy state in Git and it can be difficult to get help via a search engine that covers your exact situation. If you need help we recommend consulting “On undoing, fixing, or removing commits in git”. This page contains a very comprehensive and readable guide to getting out of a sticky situation with Git.
Key Points
Setup Git with your details using git config –global user.name “FIRST_NAME LAST_NAME” and git config –global user.email “email@example.com”
A git repository is the record of the history of a project and can be created with git init
Git records changes to files as commits
Git must be explicitly told which changes to include as part of commit (known as staging changes) with git add [file]…
Staged changes can be stored in a commit with git commit -m “commit message”
You can check which files have been changed and/or staged with git status
You can see the full changes made to files with git diff for unstaged files and git diff –staged
The commit history of a repository can be checked with git log
The command git revert commit_ref creates a new commit which undoes the changes of the specified commit
The command git reset –soft HEAD^ removes the previous commit from the history
Branching and Merging
Overview
Teaching: 40 min
Exercises: 20 minQuestions
How can I or my team work on multiple features in parallel?
How can changes from parallel tracks of work be combined?
Objectives
Explain what git branches are and when they should be used
Use a branch to develop a new feature and incorporate it into your code
Identify the branches in a project and which branch is currently in use
Describe a scalable workflow for development with git
Motivation for branches
In the previous section we tracked a guacamole recipe with Git.
Up until now our repository had only one branch with one commit coming after the other:

- Commits are depicted here as little boxes with abbreviated hashes.
- Here the branch
mainpoints to a commit. - “HEAD” is the current position (remember the recording head of tape recorders?).
- When we talk about branches, we often mean all parent commits, not only the commit pointed to.
Now we want to do this:
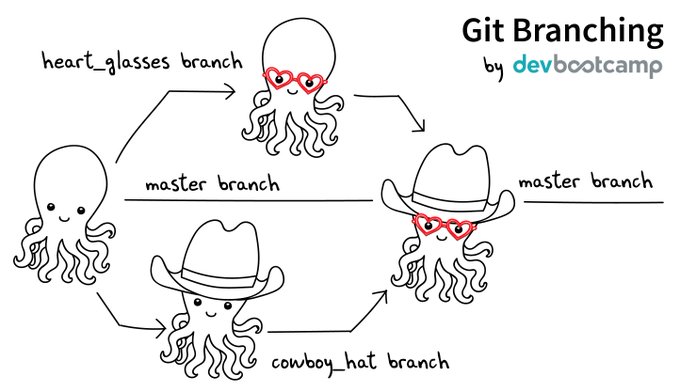
Software development is often not linear:
- We typically need at least one version of the code to “work” (to compile, to give expected results, …).
- At the same time we work on new features, often several features concurrently. Often they are unfinished.
- We need to be able to separate different lines of work really well.
The strength of version control is that it permits the researcher to isolate different tracks of work, which can later be merged to create a composite version that contains all changes:

- We see branching points and merging points.
- Main line development is often called
main. - Other than this convention there is nothing special about
main, it is just a branch. - Commits form a directed acyclic graph (arrows point from parent commits to child commits).
- Commits are relative to the preceding (parent) commit. Whilst we
previously talked about Git taking “snapshots” of your project this is
slightly misleading. Git actually records the changes made since the last
commit. The difference is subtle but powerful, it makes commands like
git
revert
possible.
A group of commits that create a single narrative are called a branch. There are different branching strategies, but it is useful to think that a branch tells the story of a feature, e.g. “fast sequence extraction” or “Python interface” or “fixing bug in matrix inversion algorithm”.
Which Branch Are We Using?
To see where we are (where HEAD points to) use git branch:
$ git branch
* main
- This command shows where we are, it does not create a branch.
- There is only
mainand we are onmain(star represents theHEAD).
In the following we will learn how to create branches, how to switch between them and how to merge changes from different branches.
A useful alias
We will now define an alias in Git, to be able to nicely visualize branch structure in the terminal without having to remember a long Git command (more details about what aliases are can be found here and the full docs on how to set them up in Git are here):
$ git config --global alias.graph "log --all --graph --decorate --oneline"
Creating and Working with Branches
Firstly lets take stock of the current state of our repository:
$ git graph
* ddef60e (HEAD -> main) Revert "Added instruction to enjoy"
* 8bfd0ff Added 1/2 onion to ingredients
* 2bf7ece Added instruction to enjoy
* ae3255a Adding ingredients and instructions
We have four commits and you can see that we are working on the main branch
from HEAD -> main next to the most recent commit. This can be represented
diagrammatically:
Let’s create a branch called experiment where we try out adding some
coriander to ingredients.md.
$ git branch experiment
$ git graph
* ddef60e (HEAD -> main, experiment) Revert "Added instruction to enjoy"
* 8bfd0ff Added 1/2 onion to ingredients
* 2bf7ece Added instruction to enjoy
* ae3255a Adding ingredients and instructions
Notice that the name of our new branch has appeared next to latest commit. HEAD is still pointing main however denoting that we have created a new branch but we’re not using it yet. This looks like:

To start using the new branch we need to check it out:
$ git checkout experiment
$ git graph
* ddef60e (HEAD -> experiment, main) Revert "Added instruction to enjoy"
* 8bfd0ff Added 1/2 onion to ingredients
* 2bf7ece Added instruction to enjoy
* ae3255a Adding ingredients and instructions
Now we see HEAD -> experiment next to the top commit indicating that we are
now working with, and any commits we make will be part of the experiment
branch. As shown before which branch is currently checkout out can be confirmed
with git branch.

Now when we make new commits they will be part of the experiment branch. To
test this let’s add 2 tbsp coriander to ingredients.md. Stage this and commit
it with the message “try with some coriander”.
$ git add ingredients.md
$ git commit -m "try with some coriander"
$ git graph
* 96fe069 (HEAD -> experiment) try with some coriander
* ddef60e (main) Revert "Added instruction to enjoy"
* 8bfd0ff Added 1/2 onion to ingredients
* 2bf7ece Added instruction to enjoy
* ae3255a Adding ingredients and instructions

Note that the main branch is unchanged whilst a new commit (labelled e1) has
been created as part of the experiment branch.
As mentioned previously, one of the advantages of using branches is working on
different features in parallel. You may have already spotted the typo in
ingredients.md but let’s say that we’ve only just seen it in the midst of
our work on the experiment branch. We could correct the typo with a new commit
in experiment but it doesn’t fit in very well here - if we decide to discard
our experiment then we also lose the correction. Instead it makes much more
sense to create a correcting commit in main. First, move to (checkout) the master branch:
$ git checkout main
Then fix the typing mistake in ingredients.md. And finally, commit that change:
$ git add ingredients.md
$ git commit -m "Corrected typo in ingredients.md"
$ git graph
* d4ca89f (HEAD -> main) Corrected typo in ingredients.md
| * 96fe069 (experiment) try with some coriander
|/
* ddef60e Revert "Added instruction to enjoy"
* 8bfd0ff Added 1/2 onion to ingredients
* 2bf7ece Added instruction to enjoy
* ae3255a Adding ingredients and instructions

Merging
Now that we have our two separate tracks of work they need to be combined back
together. We should already have the main branch checked out (double check
with git branch). The below command can then be used to perform the merge.
$ git merge --no-edit experiment
Merge made by the 'ort' strategy.
 ingredients.md | 1 +
 1 file changed, 1 insertion(+)
now use:
$ git graph
*   40070a5 (HEAD -> main) Merge branch 'experiment'
|\
| * 96fe069 (experiment) try with some coriander
* | d4ca89f Corrected typo in ingredients.md
|/
* ddef60e Revert "Added instruction to enjoy"
* 8bfd0ff Added 1/2 onion to ingredients
* 2bf7ece Added instruction to enjoy
* ae3255a Adding ingredients and instructions

Merging creates a new commit in whichever branch is being merged into that contains the combined changes from both branches. The commit has been highlighted in a separate colour above but it is the same as every commit we’ve seen so far except that it has two parent commits. Git is pretty clever at combining the changes automatically, combining the two edits made to the same file for instance. Note that the experiment branch is still present in the repository.
Now you try
As the experiment branch is still present there is no reason further commits can’t be added to it. Create a new commit in the
experimentbranch adjusting the amount of coriander in the recipe. Then mergeexperimentintomain. You should end up with a repository history matching:Solution
$ git checkout experiment
$ # make changes to ingredients.md
$ git add ingredients.md
$ git commit -m "Reduced the amount of coriander"
$ git checkout main
$ git merge --no-edit experiment
$ git graph
* 567307e (HEAD -> main) Merge branch 'experiment' |\ | * 9a4b298 (experiment) Reduced the amount of coriander * | 40070a5 Merge branch 'experiment' |\ \ | |/ | * 96fe069 try with some coriander * | d4ca89f Corrected typo in ingredients.md |/ * ddef60e Revert "Added instruction to enjoy" * 8bfd0ff Added 1/2 onion to ingredients * 2bf7ece Added instruction to enjoy * ae3255a Adding ingredients and instructions

Conflicts
Whilst Git is good at automatic merges it is inevitable that situations arise where incompatible sets of changes need to be combined. In this case it is up to you to decide what should be kept and what should be discarded. First lets set up a conflict:
$ git checkout main
$ # change line to 1 tsp salt in ingredients.md
$ git add ingredients.md
$ git commit -m "Reduce salt"
$ git checkout experiment
$ # change line to 3 tsp in ingredients.md
$ git add ingredients.md
$ git commit -m "Added salt to balance coriander"
$ git graph
* d5fb141 (HEAD -> experiment) Added salt to balance coriander
| * 7477632 (main) reduce salt
| *   567307e Merge branch 'experiment'
| |\
| |/
|/|
* | 9a4b298 Reduced the amount of coriander
| *   40070a5 Merge branch 'experiment'
| |\
| |/
|/|
* | 96fe069 try with some coriander
| * d4ca89f Corrected typo in ingredients.md
|/
* ddef60e Revert "Added instruction to enjoy"
* 8bfd0ff Added 1/2 onion to ingredients
* 2bf7ece Added instruction to enjoy
* ae3255a Adding ingredients and instructions

Now we try and merge experiment into main:
$ git checkout main
$ git merge --no-edit experiment
Auto-merging ingredients.md
CONFLICT (content): Merge conflict in ingredients.md
Automatic merge failed; fix conflicts and then commit the result.
As suspected we are warned that the merge failed. This puts Git into a special
state in which the merge is in progress but has not been finalised by creating a
new commit in main. Fortunately git status is quite useful here:
$ git status
On branch main
You have unmerged paths.
  (fix conflicts and run "git commit")
  (use "git merge --abort" to abort the merge)

Unmerged paths:
  (use "git add <file>..." to mark resolution)
	both modified:   ingredients.md

no changes added to commit (use "git add" and/or "git commit -a")
This suggests how we can get out of this state. If we want to give up on this
merge and try it again later then we can use git merge --abort.. This will
return the repository to its pre-merge state. We will likely have to deal with
the conflict at some point though so may as well do it now. Fortunately we don’t
need any new commands. We just need to edit the conflicted file into the state
we would like to keep, then add and commit as usual.
Let’s look at ingredients.md to understand the conflict:
* 2 avocados
* 1 lime
<<<<<< HEAD
* 1 tsp salt
=======
* 3 tsp salt
>>>>>> experiment
* 1/2 onion
* 1 tbsp coriander
Git has changed this file for us and added some lines which highlight the
location of the conflict. This may be confusing at first glance (a good editor
may add some highlighting which can help), but you are essentially being asked
to choose between the two versions presented. The tags <<<<<<< HEAD and
>>>>>>> experiment are used to indicate which branch each version came from
(HEAD here corresponds to main as that is our checked out branch).
The conflict makes sense, we can either have 1 tsp of salt or 3. There is no way
for Git to know which it should be so it has to ask you. Let’s resolve it by
choosing the version from the main branch. Edit ingredients.md so it looks
like:
* 2 avocados
* 1 lime
* 1 tsp salt
* 1/2 onion
* 1 tbsp coriander
now stage, commit and check the result:
$ git add ingredients.md
$ git commit -m "Merged experiment into main"
$ git graph
*   e361d2b (HEAD -> main) Merged experiment into main
|\
| * d5fb141 (experiment) Added salt to balance coriander
* | 7477632 reduce salt
* |   567307e Merge branch 'experiment'
|\ \
| |/
| * 9a4b298 Reduced the amount of coriander
* |   40070a5 Merge branch 'experiment'
|\ \
| |/
| * 96fe069 try with some coriander
* | d4ca89f Corrected typo in ingredients.md
|/
* ddef60e Revert "Added instruction to enjoy"
* 8bfd0ff Added 1/2 onion to ingredients
* 2bf7ece Added instruction to enjoy
* ae3255a Adding ingredients and instructions

Summary
Let us pause for a moment and recapitulate what we have just learned:
$ git branch               # see where we are
$ git branch <name>        # create branch <name>
$ git checkout <name>      # switch to branch <name>
$ git merge <name>         # merge branch <name> (to current branch)
Since the following command combo is so frequent:
$ git branch <name>        # create branch <name>
$ git checkout <name>      # switch to branch <name>
There is a shortcut for it:
$ git checkout -b <name> # create branch <name> and switch to it
Typical workflow
These commands can be used in a typical workflow that looks like the below:
$ git checkout -b new-feature  # create branch, switch to it
$ git commit                   # work, work, work, ...
                               # test
                               # feature is ready
$ git checkout main            # switch to main
$ git merge new-feature        # merge work to main
$ git branch -d new-feature    # remove branch
Key Points
Git allows non-linear commit histories called branches
A branch can be thought of as a label that applies to set of commits
Branches can and should be used to carry out development of new features
Branches in a project can be listed with git branch and created with git branch branch_name
The HEAD refers to the current position of the project in its commit history
The current branch can be changed using git checkout branch_name
Once a branch is complete the changes made can be integrated into the project using git merge branch_name
Merging creates a new commit in the target branch incorporating all of the changes made in a branch
Conflicts arise when two branches contain incompatible sets of changes and must be resolved before a merge can complete
Identify the details of merge conflicts using git diff and/or git status
A merge conflict can be resolved by manual editing followed by git add [conflicted file]… and git commit -m “commit_message”
Sharing your code
Overview
Teaching: 10 min
Exercises: 10 minQuestions
How can I share my code with others?
What should I take into account when sharing my code?
Objectives
Differentiate the use case for public and private repositories.
Describe the key information that should be present in a software repository.
Configure git with your GitHub credentials.
Setup a repository in GitHub.
Collaborating: what you need to know?
Often, you will need to share your code with others, either with just another person in the same office or anyone, anywhere in the world. Repository hosting services let you do precisely that, keeping all the advantages of VCS and adding on top tools to ease the collaborative development of the code:
- Managing different people working on different features.
- Keeping track of the changes introduced in the code and by whom.
- Opening, reviewing, discussing and merging “pull requests”.
- Opening “issues” to report bugs, request features or discuss different aspects of the code.
GitHub: Why GitHub?
There are several widely used repository hosting services using Git, such as GitLab or Bitbucket. In this course we will use GitHub because:
- It is very easy to use and setup.
- It is, arguably, the most used hosting service of them all.
- Imperial has a GitHub Organisation any Imperial staff or student can join. You don’t need to join for this course but instructions to do so can be found here.
Set up your GitHub account
Set up your free github account:
- Go to www.github.com/join.
- Enter your details and click “Create an account”. You can use your Imperial e-mail address, but this is not mandatory.
- Choose the Free plan.
- Check your e-mail and click “Verify email address”.
- You can fill out the questionnaire or click “skip this step”.
Create a Personal Access Token (PAT):
- In order to access GitHub from the command line, you will need a PAT.
- Follow the instructions here to generate one. Ensure that “repo” is ticked.
- Keep the PAT safe, once you nagivate away from the page you won’t be able to view it again. If you lose it, you can always regenerate it.
If you’re familiar with SSH keys, you can follow these instructions to use that alternative authentication method.
Private vs public repositories
Depending of who you want to give access to your repository, there are two broad types of repositories: private and public. This choice, the first one you will need to make, is not written in stone and you can set a repo private initially and making it public later on.
When you are part of an organization account, there are more options to control the visibility of a repository.
Private repositories
- Only you and the GitHub users you choose can have access to the repository.
- The repository is not listed in the GitHub directory neither it is discoverable by Google and other search engines.
- Ideal for testing, for projects with a view on commercialization, preliminary work on future open projects or for school/Msc/PhD projects not meant to be public.
- Free accounts (except if part of an Organisation account) have several limitations on the features that a private repository has (eg. fewer collaborative features, no GitHub pages, etc.).
Public repositories
- Anyone can see the repository, clone it and fork it (how it is then used depends on the license; see below).
- You keep control on who will be able to contribute to the repository.
- The choice for open source projects and to share your work to a wider potential user base.
Open Source Projects
There is a growing recognition that reproducibility and open source practices in scientific software development are closely interrelated. It is increasingly expected that publications are accompanied by the analysis code and raw data used to create them. As a budding researcher one of the best ways to improve the impact of your work is to make it as easy to reproduce as possible.
Read more:
Things to include in your project
There are a few files that should get used to always include in the root directory of your repository:
README.md
- Written in Markdown, it is the front page of your repo.
- Should describe in lay terms (or not) the purpose of the software, intended audience, etc.
- Should include simplified installation instructions or a link to more detailed instructions described elsewhere.
- Often includes badges, providing quick information on the status of the documentation, the builds, the software version, license, etc.
- For inspiration see Solcore
- For further guidance see Make a README or this template.
Licence
- Important in any repository, essential in a public one.
- Describes how people are allowed to use (and re-use) the information in your repository.
- Do use a standard licence file to avoid headaches and legal issues later on.
- If your repository is part of an Organisation, make sure this organisation allows that licence. Ultimately, it will be them the ones having to fight any legal battles!!
- Licence choice is also something you should consider discussing with your supervisor if relevant, they may have strong views.
See GitHub Help: Adding a license to a repository
Licence for Imperial College London software
Imperial College’s preferred licence is the permissive BSD 2- or 3-clause. You can check the details at Imperial website: Open Source Software Licences. The guidance on this site is primarily intended for members of staff however it is correct for graduate students with the exception that (subject to certain conditions) you are entitled to hold the copyright. This site also tells you who you should contact in case you want a different licence model for your work e.g. commercial.
Open Source software licences
There is a huge range of different licences, ranging from fully permissive to very restrictive. A couple of websites with more information on the topic (including how to licence things that are not software) are:
Installation process/instructions
- If short, they can be part of the README file above.
- Otherwise, they should have their own INSTALLATION.md file and, definitely, be included in any documentation you write for the software.
- Should be complete and specific for any operating system and platform you want to support.
- If you know your software will not work in, let’s say, Windows, say so!!
CITATION.cff
- Indicates how your software should be cited by anyone using it.
- A recently developed standard.
- cff = Citation File Format.
- Create and check via the provided tools.
- Supported by GitHub, Zenodo and Zotero.
Digital Object Identifiers (DOI)
If you are serious about what you are doing and want people to really cite your work properly - and get recognition for it - consider providing your repo with a digital object identifier (DOI). You can get one from:
CONTRIBUTING.md
- Are guidelines explaining how people should contribute to your project.
- Could include steps for creating good issues or pull requests.
- Often, also have links to external documentation, mailing lists, or a code of conduct and community and behavioral expectations.
See GitHub Help: Setting guidelines for repository contributors.
Creating a repository
Now you have all the information you need to create a new repository in GitHub. Just follow this steps:
- Once logged in to GitHub, press the
+symbol in the top right, and choosenew repositoryfrom the dropdown menu.- Give your repository the name
example.- Add a short description for your project.
- You are going to create a Public repository, so select that option.
- Click on Initialize this repository with a README. This will create an empty README file in the root directly that you can edit later on.
- Select a licence for your repository. Which one is up to you, but make sure you have read what they entail before (Tip: there is a little “i” next to the dropdown list with some help on this. In case of doubt, choose BSD 3 -clause.
Solution
Your repository is now ready and you should see something similar to this:
It tells you there is only 1 commit, 1 branch and 1 contributor, the type of licence you have chosen and also that there are two files: LICENSE and README.md, which is also rendered immediately below.
To make this complete, let’s add some contributing guidelines:
- Go to Insights in the upper right corner of the repository.
- And then click on Community Standards on the left hand side.
- The screen now shows how the project compares with the recommended community standards. Is not bad, but could be better.
- Click on Add in the Contributing line. In the new screen you can write your contributing guidelines. Tip: No one writes this from scratch.
Have a look at some Examples of contributing guidelines and copy/paste those parts relevant for your project.
- Once you are done, click on Commit new file and the changes will be confirmed. Now you should see a CONTRIBUTING.md file in the root directory.
Key Points
Public repositories are open to anyone to use and contribute.
Private repositories are just for yourself or a reduced set of contributors.
README contains a description of the software and, often, some simplified installation instructions.
The LICENSE describes how the software must be distributed and used.
Using one of the OSI (open source initiative) licenses is recommended if the repository is public.
CONTRIBUTING describes how other users can help developing the software.
CITATION helps others to cite your software in their own papers.
GitHub can be used to setup a software repository, share your code and manage who and how can access it.
Remote repositories
Overview
Teaching: 20 min
Exercises: 20 minQuestions
Is my local repository the same as the remote one?
How can I send my local changes to the remote one?
How can I get the changes others have made?
Objectives
Explain the differences between a local and a remote repository.
Explain what tracking and upstream mean.
Use the push command to send changes on the local branch to the remote one.
Use the pull command to update your local branch with the remote one.
Find out the available remote branches.
Setup a local branch to track a new remote one.
Remote and local repositories
- The repository you just created in the previous episode is a remote repository: it is hosted by a third party hosting system, GitHub in this case.
- The repository you used in Lesson 1 was a local repository: it was just a directory on your hard drive using git for version control.
- Local and remote repositories can be synchronized, so changes are accessible by other contributors.
- This synchronisation is not automatic: it has to be done explicitly for each branch you want to keep up to date (see pull and push below ).
- The default name for a remote repository synchronised with a local one is
origin.
Tracking and upstream
- A local branch synchronised with a remote one is said to be tracking that remote branch.
- The remote branch being tracked is called the upstream branch.
Configuring repositories
Depending on whether you are starting from a remote repository and want to get a local one out of it or the other way around, the steps are different.
Configuring a remote repository from a local one
In this case, you have a local repository and you want to synchronise it with a new, remote one. Let’s create a remote for the
reciperepository you worked on in Lesson 1. If you have lost your copy of thereciperepository you can download a completed copy here:
- Create a new repository in GitHub, as in the last episode. Give it a name, description and choose if it should be public or private, but do not add any other file (no README or licence).
- You will be offered a few options to populate the remote repository. We are interested in the third one. You will need to make sure HTTPS is selected (not SSH) for your personal access token to work.
- Launch a new command line interface and run
cd recipeto navigate to the directory where you have your local repository - Then execute:$ git remote add origin [address of your remote repo] # The address should start with https:// and end in .git $ git push -u origin mainMac and Linux users: You will be asked to provide your GitHub username and password. Enter your personal access token (PAT) as your password.
Windows users: You will be presented with a CredentialHelperSelector dialog box. Ensure “manager-core” is selected and check the box for “Always use this from now on”. Press Select. From the next dialog select “Token” then paste the PAT you saved earlier and press “Sign in”. On subsequent interactions with GitHub your credentials will be remembered and you will not be prompted.
- The first line above will set the GitHub repository as the remote for your local one, calling it
origin.- The second line will push your main branch to a remote one called
origin/main, setting it as its upstream branch.- You can check if things went well by going to GitHub: the repository there should contain all the files of your local repository.
Configuring a local repository from a remote
This involves the git command clone. Let’s create a local copy of the
examplerepository you created remotely in the last episode.
- On GitHub, the press down arrow in the far top right and choose “Your repositories” from the drop-down menu.
- Choose the
examplerepository from the list.- In the main screen of your repository, click on the green button on the right, Clone or Download, and copy the address that appears there.
- Open a new command line interface and execute the commands:
$ git clone [address of your remote repo]
$ cd example
- This will download the remote repository to a new
exampledirectory, in full, with all the information on the branches available inoriginand all the git history.- By default, a local
mainbranch will be created tracking theorigin/mainbranch.- You can find some information on the repository using the commands already discussed in Lesson 1, like
git logorgit branch -vv, which should show that there is indeed just one branch,maintrackingorigin/main)

Pushing
- Its basic use is to synchronize any committed changes in your current
branch to its upstream branch:
$ git push. - Changes in the staging area will not be synchronized.

- If the current branch has no upstream yet, you can configure one by doing
$ git push -u origin [branch_name], as done withmainin the exercise above.
pushonly operates on your current branch. If you want to push another branch, you have tocheckoutthat branch first.- If the upstream branch has changes you do not have in the local branch, the command will fail, requesting you to merge those changes first. We will discuss this into more detail in the next episode.
Pushing an updated README
You want to update the README file of the
examplerepository with more detailed information of what the repository is about and then push the changes to the remote.Modify the README file of your local copy of
examplewith your preferred editor (any change is good enough, but better if they are useful - or at least, funny!) and synchronise the changes with the remote. Check on GitHub that you can view the changes you made.Solution
$ git add README.md
$ git commit -m [Commit message]
$ git push
Pulling
- Opposite to
push,pullbrings changes in the upstream branch to the local branch. - You can check if there are any changes to synchronize in the upstream
branch by running
git fetch, which only checks if there are changes, and thengit statusto see how your local and remote branch compare in terms of commit history. - It’s best to make sure your repository is in a clean state with no staged or unstaged changes.
- If the local and upstream branches have diverged - have different commit history - the command will attempt to merge both, dealing with conflicts as discussed in Lesson 1.
- You can get a new branch existing only in
origindirectly withgit checkout [branch_name]without the need of creating the branch locally and then pulling the remote.

Pulling an updated README
When reviewing your new README file online, you have discover a typo and decided to correct it directly in GitHub. Modify the README file online and then synchronise the changes with your local repository (tip: you can edit any text file directly in GitHub by clicking in the little pencil button in the upper right corner).
Solution
$ git fetch
$ git status
This will indicate that the remote branch is ahead of your local branch by 1 commit. Since there are no diverging commits, it is safe to pull.
$ git pull
Key Points
origin is typically the name of the remote repository used by git.
Local and remote repositories are not identical, in general.
Local and remote repositories are not synchronized automatically.
push and pull commands only affect the branch currently checked out.
Only changes to a branch that are committed are pushed to the remote.
Local branches need to be explicitly pushed to a new remote one in order to share them.
Collaborating
Overview
Teaching: 20 min
Exercises: 40 minQuestions
How can I make a contribution to other people’s repositories?
How do I know what changes other people are making in my repo?
Objectives
Explain what forks and pull requests (PR) are.
Open a PR to make a contribution to someone else’s repository.
Review a PR to check what changes have been made.
(Bonus) Update your fork to keep it up to date with the original repository.
Now that you have your repositories in GitHub, you will learn how to start collaborating with other people, contributing with content to their repositories and accepting other’s contributions to your own.
Forking someone else’s repository
- By default, a public repository can be seen by anyone but only the owner can make changes e.g. create new commits or branches.
forkinga repository means creating a copy of it in your own GitHub account.- This copy is fully under your control, and you can create branches, push new commits, etc., as you would do with any other of your repos.
forkis a GitHub concept and not Git.forksare related to the original repository, and the number of forks a given repository has can be seen in the upper right corner of the repo page.- If you have some changes in your fork that you want to contribute to the
original repo, you open a
pull request.
The image below shows that this repository has been forked 6 times already. To
fork it yourself, click on fork and choose your personal account.

Playing with a fork
Visit this repository and fork it. Explore the options in the repo. What’s different from a repository you created? And from the original one?
Solution
- The only visual difference with one of your repos is that there is a note just below the name indicating where this repo was forked from.
- You can also open a pull request (see below) across forks.
- In the original repo, you don’t have write access, i.e. you cannot modify any file or change any setting.
Pull requests
pull requests(or PRs, for short) are the GitHub method of contributing to other people’s repositories and keep track of changes made to your own.- As with
forks, PRs are a GitHub concept. - A
pull requestmeans: “Hey, I have some changes I would like to contribute to your repo. Please, have a look at them andpullthem into your own.” - You can open a PR from a branch in your repo to another branch in your own repo or the original repository it was forked from.
- Depending on the access settings, some branches might not allow to have PR
opened against them. These are
protectedbranches and are often associated to “stable” versions of the software contained in the repo. - In a repository with several collaborators, opening PR against branches in the same repo are the best method of letting them know of the changes you are introducing.
- The CONTRIBUTING file of the repository contains details on what information should be included in a PR to make it clear and effective.
To open a PR, just click on the corrsponding button next to the branch selector, as shown in the next figure.

In the next screen, you can select the target branch (where things will be merged, if the PR is accepted) and the branch that you want to merge. You can open PR involving branches within the same repo or between a repo and any other fork of it. Once the branches are selected, a comparison between the files that are different will appear below.

Requesting reviewers
- When opening a PR, you can request it to be reviewed by someone else, so there is another pair of eyes making sure that your contribution is correct and does not introduce any bugs.
- Reviewers can just comment on the PR, approve it, or request changes before it can be approved.
- Some repositories might require the approval of one or more reviewers before the changes can be merged into the target branch.
- Only administrators of the target repository can merge PR.
Reviewing a PR
- When reviewing a PR, you will be shown, for each file changed, a comparison
between the old and the new version, much like
git diff(indeed, it isgit diffbetween the original and target branches, just nicely formatted). - You can add comments and suggest changes to specific lines in the code.
- Comments and suggestions must be constructive and help the code to become better. Comments of the type “this can be done better” are discouraged. The CONTRIBUTING or the CODE_OF_CONDUCT files often contain information on how to make a good review.
Issues
- Issues are another feature of GitHub, used to report bugs, request features or enhancements, or to discuss implementation details of some parts of the code.
- Issues are a kind of TODO list, with pending and completed tasks as well as serving to prioritise the development activity.
- Labels can be added to the issues by the repository administrator to inform at a first glance what the issue is about. Typical labels are “bug”, “enhancement”, “low priority” or “good first issue”, for example.
- Issues also can have one or more people assigned to them who will take care of sorting them out and closing them when done or if no longer relevant.
- By default any GitHub user can create an issue in a public repository
Mentioning other issues and PR
All issues and PR receive a tag number starting at 1 and preceded by #, like #40 or #110. If you want to refer to an issue or PR in any comment anywhere in GitHub, just use its tag number and these will be automatically linked from the comment.
Claim issues
There are some restrictions on who can be assigned to an issue. If you do not have write access to the repository (which is often the case) and you are not part of the same organisation of the repository, the only way of being assigned to an Issue is by making a comment on the Issue. This also serves to warn others that you are volunteering to work on that. A “Hey, I can tackle this.” is often enough.
Closing issues
If a PR tackles a particular issue, you can automatically close that issue when the PR is merged by indicating
Close #ISSUE_NUMBERin any commit message of the PR or in a comment within the PR.
The following figure shows some of the issues open in a certain repository. The labels tell us there are a couple of bug reports, a couple of issues related to the performance of the software and several ones that are simple enough to be tackled by novice people. Most of them have some discussion going on.
To open a new issue, simply click on the New Issue green button on the right.

An example workflow
We now have all of the components needed to start working collaboratively through GitHub. A typical workflow might look like this:
- You discover a cool looking project on GitHub. You decide you want to help out
and browse through the
issues. You find one you think you can help out with. - You
forkthe project to your own GitHub account. - You
clonethe project from your fork to your local machine. - You create a new branch with
git branch issue_fixand check it out withgit checkout issue_fix - You make the changes to the code, creating several commits in the process
- You push the new commits in the
issue_fixbranch to your remote copy of the project withgit push -u origin issue_fix - On GitHub you create a
Pull Requestmerging your new branch into main of the original project. - The project owner reviews your Pull Request and asks for some changes.
- You make the changes in your local copy of the
issue_fixbranch and usegit pushto update your remote fork with the new commits. This automatically updates your Pull Request. - Your Pull Request is approved and accepted, the
issue_fixbranch is added to the original repository and a merge commit is created incorporating your changes. - Job done! You can delete your fork on GitHub if you want.
If there is a group of you that will be working together on a project you can avoid needing to have individual forks by setting up collaborators. This allows you to grant write access to other users to a public or private repository. In this case we still strongly recommend working in separate branches and communicating through issues and pull requests.
Making a book of recipes
Together with some colleagues, you are writing a book of recipes for sauces and you are using git for version control and GitHub to collaborate in the writing of the book.
Form groups of 3-4 people and choose one to act as administrator. This person should:
- Fork the Book of Recipes repository with the skeleton of the book.
- Pass the link to the repo to your colleagues.
Enabling issues in forks
By default, when you fork a repository, Issues are disabled. To enable them go to
Settingsin the upper right corner, then toOptionsin the left panel and, finally, scroll down to theFeaturessection. There click the Issues tickbox to enable them.Now, start collaborating!
- All, including the administrator, open new issues with recipes for sauces you will like to have in the book.
- Administrator, add some tags, prioritising some of the recipes, and assign yourself or one of your colleagues as responsible for each of them. Remember you will need to “Claim the Issue” first in order to be assigned to it, as discussed above.
- Fork the administrator’s repository. Administrator, did you notice how the number of forks increases? Which GitHub users forked it from you? And from the original repo?
- Work on the recipes you have been assigned. Practice the concepts learnt in previous episodes about cloning a repository, making the changes locally and pushing those changes back to the remote repository. You can even try a gitflow aproach if you feel ambitious!
- When ready, open a PR to the administrator’s repo and request his/her review.
- Administrator, review the PR, request some changes and accept others. When ready, merge the PR.
These exercises can be repeated with the other members of the group acting now as administrators and choosing a different topic for the recipes (eg . pasta, roasts, cocktails, etc.).
Bonus: Keeping your fork sync with the original repo
In the previous exercise, the individual forks will be outdated as you contribute with content to the administrator’s repo. Follow these instructions to make sure that your own forks are kept up to date.
Key Points
Forks and pull requests are GitHub concepts, not git.
Pull request can be opened to branches on your own repository or any other fork.
Some branches are restricted, meaning that PR cannot be open against them.
Merging a PR does not delete the original branch, just modifies the target one.
PR are often created to solve specific issues.