Remote repositories
Overview
Teaching: 20 min
Exercises: 20 minQuestions
Is my local repository the same as the remote one?
How can I send my local changes to the remote one?
How can I get the changes others have made?
Objectives
Explain the differences between a local and a remote repository.
Explain what tracking and upstream mean.
Use the push command to send changes on the local branch to the remote one.
Use the pull command to update your local branch with the remote one.
Find out the available remote branches.
Setup a local branch to track a new remote one.
Remote and local repositories
- The repository you just created in the previous episode is a remote repository: it is hosted by a third party hosting system, GitHub in this case.
- The repository you used in Lesson 1 was a local repository: it was just a directory on your hard drive using git for version control.
- Local and remote repositories can be synchronized, so changes are accessible by other contributors.
- This synchronisation is not automatic: it has to be done explicitly for each branch you want to keep up to date (see pull and push below ).
- The default name for a remote repository synchronised with a local one is
origin.
Tracking and upstream
- A local branch synchronised with a remote one is said to be tracking that remote branch.
- The remote branch being tracked is called the upstream branch.
Configuring repositories
Depending on whether you are starting from a remote repository and want to get a local one out of it or the other way around, the steps are different.
Configuring a remote repository from a local one
In this case, you have a local repository and you want to synchronise it with a new, remote one. Let’s create a remote for the
reciperepository you worked on in Lesson 1. If you have lost your copy of thereciperepository you can download a completed copy here:
- Create a new repository in GitHub, as in the last episode. Give it a name, description and choose if it should be public or private, but do not add any other file (no README or licence).
- You will be offered a few options to populate the remote repository. We are interested in the third one. You will need to make sure HTTPS is selected (not SSH) for your personal access token to work.
- Launch a new command line interface and run
cd recipeto navigate to the directory where you have your local repository - Then execute:$ git remote add origin [address of your remote repo] # The address should start with https:// and end in .git $ git push -u origin mainMac and Linux users: You will be asked to provide your GitHub username and password. Enter your personal access token (PAT) as your password.
Windows users: You will be presented with a CredentialHelperSelector dialog box. Ensure “manager-core” is selected and check the box for “Always use this from now on”. Press Select. From the next dialog select “Token” then paste the PAT you saved earlier and press “Sign in”. On subsequent interactions with GitHub your credentials will be remembered and you will not be prompted.
- The first line above will set the GitHub repository as the remote for your local one, calling it
origin.- The second line will push your main branch to a remote one called
origin/main, setting it as its upstream branch.- You can check if things went well by going to GitHub: the repository there should contain all the files of your local repository.
Configuring a local repository from a remote
This involves the git command clone. Let’s create a local copy of the
examplerepository you created remotely in the last episode.
- On GitHub, the press down arrow in the far top right and choose “Your repositories” from the drop-down menu.
- Choose the
examplerepository from the list.- In the main screen of your repository, click on the green button on the right, Clone or Download, and copy the address that appears there.
- Open a new command line interface and execute the commands:
$ git clone [address of your remote repo]
$ cd example
- This will download the remote repository to a new
exampledirectory, in full, with all the information on the branches available inoriginand all the git history.- By default, a local
mainbranch will be created tracking theorigin/mainbranch.- You can find some information on the repository using the commands already discussed in Lesson 1, like
git logorgit branch -vv, which should show that there is indeed just one branch,maintrackingorigin/main)
Pushing
- Its basic use is to synchronize any committed changes in your current
branch to its upstream branch:
$ git push. - Changes in the staging area will not be synchronized.

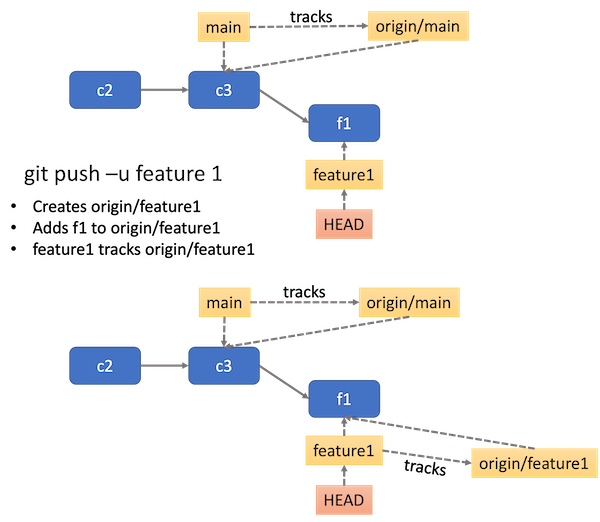
- If the current branch has no upstream yet, you can configure one by doing
$ git push -u origin [branch_name], as done withmainin the exercise above.
pushonly operates on your current branch. If you want to push another branch, you have tocheckoutthat branch first.- If the upstream branch has changes you do not have in the local branch, the command will fail, requesting you to merge those changes first. We will discuss this into more detail in the next episode.
Pushing an updated README
You want to update the README file of the
examplerepository with more detailed information of what the repository is about and then push the changes to the remote.Modify the README file of your local copy of
examplewith your preferred editor (any change is good enough, but better if they are useful - or at least, funny!) and synchronise the changes with the remote. Check on GitHub that you can view the changes you made.Solution
$ git add README.md
$ git commit -m [Commit message]
$ git push
Pulling
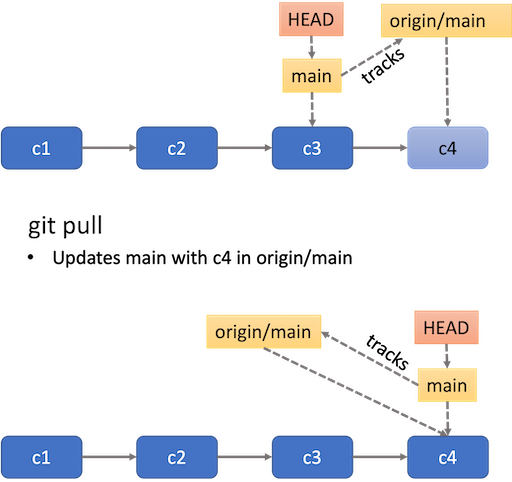
- Opposite to
push,pullbrings changes in the upstream branch to the local branch. - You can check if there are any changes to synchronize in the upstream
branch by running
git fetch, which only checks if there are changes, and thengit statusto see how your local and remote branch compare in terms of commit history. - It’s best to make sure your repository is in a clean state with no staged or unstaged changes.
- If the local and upstream branches have diverged - have different commit history - the command will attempt to merge both, dealing with conflicts as discussed in Lesson 1.
- You can get a new branch existing only in
origindirectly withgit checkout [branch_name]without the need of creating the branch locally and then pulling the remote.

Pulling an updated README
When reviewing your new README file online, you have discover a typo and decided to correct it directly in GitHub. Modify the README file online and then synchronise the changes with your local repository (tip: you can edit any text file directly in GitHub by clicking in the little pencil button in the upper right corner).
Solution
$ git fetch
$ git status
This will indicate that the remote branch is ahead of your local branch by 1 commit. Since there are no diverging commits, it is safe to pull.
$ git pull
Key Points
origin is typically the name of the remote repository used by git.
Local and remote repositories are not identical, in general.
Local and remote repositories are not synchronized automatically.
push and pull commands only affect the branch currently checked out.
Only changes to a branch that are committed are pushed to the remote.
Local branches need to be explicitly pushed to a new remote one in order to share them.
