Training a Convolutional Neural Network in PyTorch
In this exercise we will fine-tune a pretrained CNN to learn to predict perception scores. Before we dive into the components of the model, we will just get the code up and running with the default settings.
Training Locally
Locally means using the current hardware in your computer or laptop to run model training. If you have not yet done so, now is a good time to clone this repository into your local drive (see Getting Started).
Let's check the model training runs locally (albeit slowly without a GPU). From recode-perceptions run:
python3 -m deep_cnn                     \
--epochs=1                              \
--data_dir=tests/places_test_input      \
--bacth_size=1
A brief description of all arguments is returned with the following:
python3 -m deep_cnn -h
usage: __main__.py [-h] [--epochs EPOCHS] [--batch_size BATCH_SIZE]
                   [--model MODEL] [--pre PRE] [--root_dir ROOT_DIR] [--lr LR]
                   [--run_name RUN_NAME] [--data_dir DATA_DIR] [--wandb WANDB]

optional arguments:
  -h, --help            show this help message and exit
  --epochs EPOCHS       number of training epochs
  --batch_size BATCH_SIZE
                        batch size for SGD
  --model MODEL         pre-trained model
  --pre PRE             pre-processing for image input
  --root_dir ROOT_DIR   path to recode-perceptions
  --lr LR               learning rate
  --run_name RUN_NAME   unique name to identify hyperparameter choices
  --data_dir DATA_DIR   path to input data
  --wandb WANDB         track progress in wandb.ai
where root_dir is your local path to recode-perceptions, and data_dir is your path to input/places365standard_easyformat/places365_standard. If you have not yet downloaded the full image dataset, but you want to run this script locally, you can run the test images, tests/test_input/test_images/.
You should see the following output in your terminal:
Running on cuda device
Epoch 0:   2%|██▎                                 | 35/1697 [00:19<15:28,  1.79batch/s, loss=3.06]
If you have a GPU locally, you will also see 'Running on cuda device'. However, this will be replaced by CPU if no GPU device is found. The model is training through its first epoch batch by batch. This one epoch is expected to take 15 minutes to complete.
Once finished, the full log can be found in the folder outputs/logger/. You will find an annotated version in the repository.
Hyperparameter Optimisation
Let's take a look at the design choices which can be made for model training.
| Parameter | Description | Trade Offs | References |
|---|---|---|---|
| Epochs | Determine the number of times to run through the entire training batch. | Typically there is an inflection point where decreases in loss are marginal. Continued increase after this reflects overfitting | Bias-Variance Trade-Off |
| Batch size | Number of samples for each training step | Smaller batch sizes increase performance of stochastic gradient descent algorithms while also preserving memory by loading in batches. Larger batch size can speed up computation. | Batch-size |
| Learning Rate | Step size of parameter update at each iteration | A larger learning rate requires fewer epochs but can easily result in unstable results such as local minima. Smaller learning rates can fail to find an optima at all. Adaptive learning rates consider large step sizes in the earlier epochs of training and reduces the step size in later epochs | Learning Rates |
| Model | Pre-trained model | Can vary by size, depth, structure and trainable parameters Smaller models are faster to train while deeper model typically achieve higher levels of abstraction. Models with dropout can avoid overfitting, | PyTorch pre-trained models |
| Pre-processing | Image pre-processing required for model input | Pre-trained models have parameters trained within a given range and perform better when the target dataset distribution is closer matched to the source dataset distribution | - |
There is never a one-rule-fits-all-approach to training a deep neural network. Design choices can be guided by the domain task, the dataset size and distribution, hardware constraints, time constraints or all of the above. The wonder of moden software and computing is that the cycle of iterating on model choices has been sped up enormously:

There exists many types of search algorithms for finding the optimal hyperparameters, such as gridded search, random search and Bayesian optimisation. We would like to add a priori the wisdom of the crowd. There has been a lot written about deep learning hyperparameters, so we don't need to go in blind. To help you configure some intervals, consider the following questions
- How many epochs will ensure you have reached the global minima?
- How much memory constraints do you have on model and batch size?
- What ratio of batch size to data samples/classes is considered a benchmark?
- What is a typical learning rate for similar image classification tasks?
- How can an adaptive learning rate be implemented?
- Which model has shown the best performance on benchmark datasets? Is there a PyTorch version to download pre-trained weights?
- Does this model require certain pre-processing? If yes, you will have to add the preprocessing to dataset_generator.py
Once you have answered the questions above, you will have a constraint on what is reasonable to test.
When performing hyperparameter optimisation, we will not evaluate our test performance during training. This test set will be a hold-out set used only to evaluate the performance of our final model after training. Instead, we evaluate the performance of the model during training on the validation set. This is done typically to avoid overfitting to the test set during hyperparameter optimisation. Our goal in training is to test the generalisability of our training paradigm and the test-set allows us to do this.
Hyperparameter optimisation using wandb.ai
We will use weights and biases to track our model training and validation. This platform uses a lightweight python package to log metrics during training. To use this, you will need to create an account at https://wandb.ai/site. You can create an account using your GitHub or Gmail. You will be prompted to create a username, keep a note of this. Once you have completed your registration, you will be directed to a landing page with an API key, keep a note of this too.
Once you have configured your user credentials, create a new project called recode-perceptions. This folder will log all of our training runs. In order for python to get access to your personal user credentials, you will have to set them as environmental variables which python then accesses using os.getenv("WB_KEY"). Set your environmental variables as follows:
export WB_KEY=API_KEY
export WB_PROJECT="recode-perceptions"
export WB_USER="username"
export WANDB_MODE=online
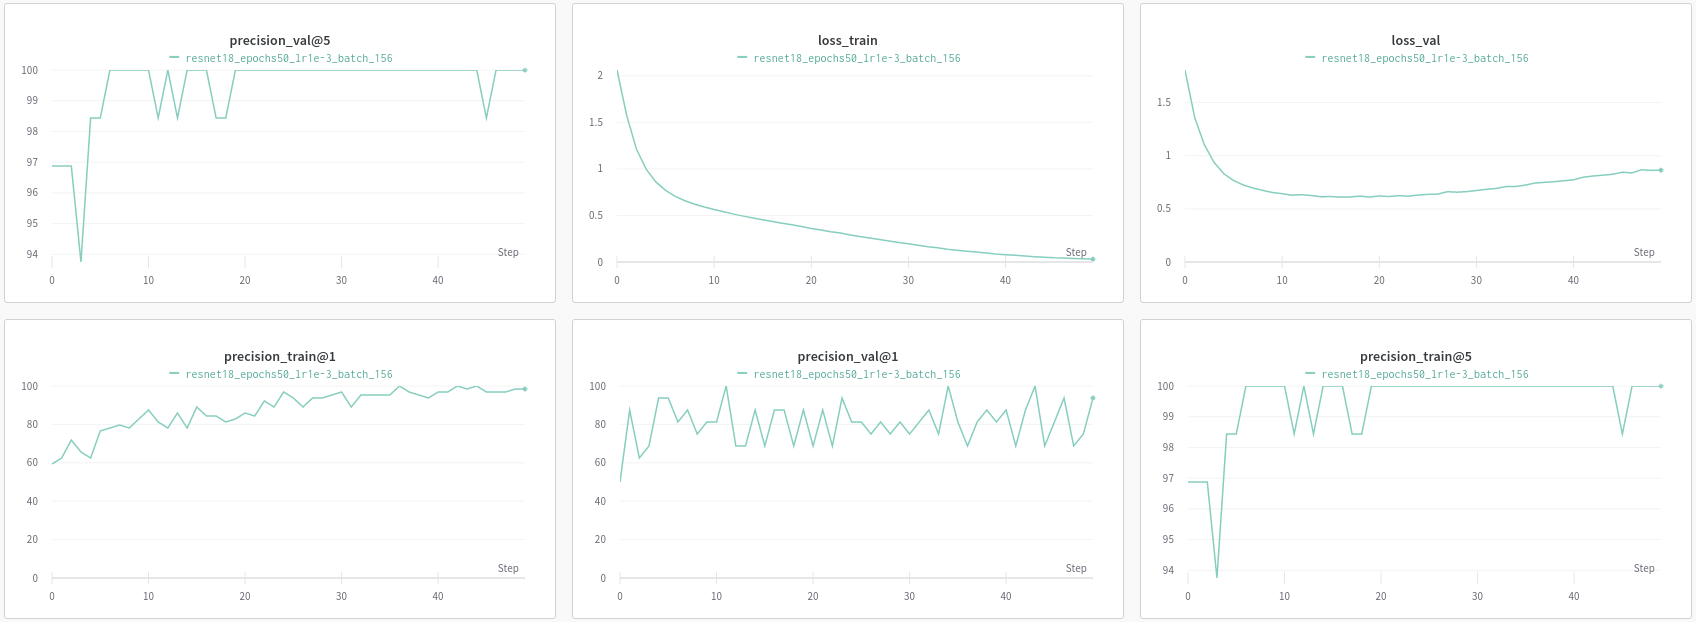
If you now run the scripts with --wandb=True, you should begin to see the metrics being tracked on the platform:

Export to HPC
Getting Started
We can move our training to the HPC to utilise the hardware resources available to us on the university cluster. If you haven't yet had the chance, now is a good time to read more about the computer services offered by the High Performance Computing cluster. There is a lot of help available from online resources, support clinics, or training courses.
You can connect to the HPC using SSH:
ssh -XY user@login.hpc.ic.ac.uk
The Research Data Store is accessible as a network share, at the location \\rds.imperial.ac.uk\RDS\user\. There you will have read/write access to your home and ephemeral spaces, along with any projects you are a member of.
You will be prompted to enter your password. You now have terminal access to your remote HPC resources. You will need a remote copy of the recode-perceptions repository. Git clone this directly as in the main repo README.md and proceed to download the Image dataset
Dataset
The dataset can be downloaded by executing the data_download.sh script. You will first need to enter your remote path to the recode-perceptions directory (line 5).
GLOBIGNORE specifies folders which should be ignored when performing recursive deletes.
The datasets were not released by us, and we do not claim any rights on them. Use the datasets at your responsibility and make sure you fulfil the licenses that they were released with. If you use any of the datasets please consider citing the original authors of Places365.
Setting up the Environment
Similarly to how we created a virtual environment locally, we will have to conifugure our environment on the hpc. We will be using anaconda this time, which is a distibution of Python which aims to simplify package management.
The environment.sh bash file is in the main repo and can be executed with the following:
[user@login-c recode-perceptions]$ chmod +xr environment.sh
[user@login-c recode-perceptions]$ ./environment.sh
This file first loads the conda and cuda module and then initiaties a Python 3.7 environment before conifiguring the necessary packages. This should take a few minutes.
Submitting jobs to the HPC
Once the environment is configured, we can submit the programme requesting access to HPC GPU's. First, configure the path to recode-perceptions directory in your drive (line 9). Then, copy over your wandb.ai credentials into the submit.pbs script (lines 10-12). Then run:
[user@login-c recode-perceptions]$ qsub submit.pbs
See HPC resources for how to request GPUs. Job submissions will result in the creation of two files, stderr and stdout. Inspecting these files you will see a similar output to when we ran the programme locally. In addition, logger will write file to outputs/logger, as well as training being logged on wandb.ai.
Revisit Hyperparameter Optimisation and iterate on model choices using run_name to track design choices.