Code versions, releases and tags
Overview
Teaching: 15 min
Exercises: 5 minQuestions
What is a Git tag and how does it differ from a branch?
How can I tag commits?
How and when should I release a new version of my code?
What is the difference between major and minor version changes?
How can I effectively communicate what has changed between versions?
How can I publish a release on Github?
Objectives
Understand what is meant by a release and a version
Know how to tag a given commit
Understand how to give your software meaningful version numbers with semantic versioning
Know how to push your tags and publish a release of your software
Background: To release or not to release?
All of you will already be familiar with the concept of software versioning. Often when
you download a piece of software from its website it’ll tell you that it’s v13.4.2 (or
whatever) that you’re downloading.
Releasing software with an explicit version number like this is a common practice and one that you may eventually consider for some of your own projects. We will show you how to do this using Git and GitHub. Even if you never end up making a release yourself, rest assured that sooner or later you will have to work with a repository which uses releases like this, so it’s important to understand the concepts at least.
The first question you might have is:
Why do I need a “version” for my software? Isn’t Git tracking the version anyway?
Sort of. The problem here is that the word “version” can mean several different things
in the context of Git. Ordinarily, when people talk about a particular version of a
piece of software, they mean a version with a particular release number, such as
v13.4.2. However, in another sense, each commit in your repository represents a
different version of the code and can be represented by a unique commit hash (e.g.
a34042b).
To avoid confusion, people usually refer to the first kind of version as a “release” and the second as a “commit”, which is what we’ll do here.
When should I consider creating releases?
You might consider creating releases if:
- You have a large, distributed user base and you don’t want them just using some random commit from your repository
- You periodically add or change features in a non-backwards-compatible way
- You want to bundle these features together and advertise them to your users
- Your software is complex and you can’t guarantee that every commit on
mainhas been thoroughly tested - You want to be able to support several versions of your software simultaneously (e.g. you intend to maintain a v2 of your software, even after v3 has been released)
- You want to provide a place to download files that you’ve generated (such as
.exefiles) and distribute them to users
In general, though, creating a release is also just a convenient way to label a
particular commit, so it’s a useful way to ensure that the users you’re sharing it with
– who may not be technically savvy – are using a specific commit, rather than simply
whatever the latest commit on main is.
When don’t I need to create releases for my software?
You probably don’t need to create releases for your software if:
- The code never changes
- You’re the only developer and the only user (e.g. it’s some analysis scripts that only you use)
- (OR there are only a few of you and you all just use the latest commit etc.)
- The software is simple and doesn’t change much from one commit to the next
In this case, if you just need to clarify which commit you’re working from (e.g. to a colleague), you can always obtain the current commit hash like so:
git rev-parse --short HEAD
a34042b
Labelling a particular commit with git tag
Git tags provide a way to give human-readable names to specific commits. We will now go through how to add and remove tags to your repository.
Firstly, remind yourself what the history for your recipe repository looks like with
git log. Mine looks like this:
git log --oneline
a34042b (HEAD -> spicy) Chillies added to the mix
d10e1e9 (main) Guacamole must be served cold
5344d8f Revert "Added 1/2 onion to ingredients"
fe0d257 Merge branch 'experiment'
99b2352 Reduced the amount of coriander
2c2d0e2 Merge branch 'experiment'
6a2a76f Corrected typo in ingredients.md
d9043d2 try with some coriander
57d4505 (origin/main) Revert "Added instruction to enjoy"
5cb4883 Added 1/2 onion to ingredients
43536f3 Added instruction to enjoy
745fb8b adding ingredients and instructions
(Note that yours may look different depending on whether you followed the steps yourself or downloaded the pre-made repository.)
Let’s say that you have decided that the point at which you added half an onion was a highpoint in the recipe’s history and you want to make a note of which commit that was for a future date by giving it the tag “tasty”. You can do this like so:
git tag tasty [commit hash]
In my case, I ran:
git tag tasty 5cb4883
You can list the tags for your repo by running git tag without any arguments:
git tag
tasty
To check which commit hash this corresponds to, use:
git rev-parse --short tasty
5cb4883
Double-check that this is the commit you intended to tag by running git log (or
git graph) again.
Note that tasty can now be used like other git references, such as commit hashes and
branch names. For example, you can run git checkout tasty to (temporarily) update the
contents of your repo to be as they were back when you added half an onion to the
instructions.
You may now be wondering, if this is the case, then how is a tag different from a
branch? Try checking out tasty to see what happens:
git checkout tasty
Note: switching to 'tasty'.

You are in 'detached HEAD' state. You can look around, make experimental
changes and commit them, and you can discard any commits you make in this
state without impacting any branches by switching back to a branch.

If you want to create a new branch to retain commits you create, you may
do so (now or later) by using -c with the switch command. Example:

    git switch -c <new-branch-name>

Or undo this operation with:

    git switch -

Turn off this advice by setting config variable advice.detachedHead to false

HEAD is now at 5cb4883 Added 1/2 onion to ingredients
Git provides some helpful output describing what you’ve just done (although note that we
don’t cover the git switch command in this course). The “detached HEAD state” is
git’s way of saying that your repo is not on any branch at all, so if you commit any
changes, they won’t be saved to any branch. Note that your tag will stay pointing to the
same commit it was before. This is the difference between a branch and a tag. The tip
of a branch points to the last committed change to the branch, whereas a tag always
points to a specific commit. Think about it this way: when you release a piece of
software, you want that version – say, v1.0 – to represent the code in one unique
state. You don’t want two of your users to be using two different versions of the code
both labelled v1.0, for example.
Fortunately, a detached HEAD is a much less serious affliction for git repos than
human beings, and you can reattach it by simply checking out a branch:
git checkout main
Assume now that you have decided that you no longer want this tag (perhaps on eating, it turned out not to be tasty after all). You can delete the tag like so:
git tag -d tasty
Deleted tag 'tasty' (was 5cb4883)
Exercise: Try creating your own tag
Now try it yourself. Choose a different commit and give it a label using
git tag. Confirm that you can check out this commit. Once you have finished, delete it.
There is one last important thing to know about git tags. Like branches, they are not automatically synced with your remote (e.g. GitHub) and have to be pushed explicitly. We will cover this later, but first let’s discuss how to give your software a descriptive version number.
What’s in a version number?
While your code will no doubt smell as sweet however you number your releases, it is useful for your users if you use a versioning scheme that conveys some information about the kind of thing that is likely to have changed since the last version. Unfortunately, this practice is not universal. Often with software releases, the meaning behind the version number is rather opaque, except for the fact that higher numbers generally mean “newer”. It often isn’t obvious to what extent a new version of a piece of software is compatible with older versions – if at all!
Amidst this confusion, a convention that is becoming increasingly common is so-called
semantic versioning. A semantic version number is composed of
three numbers separated by dots, e.g. v1.2.3. In order, these numbers are referred to
as the “major version”, “minor version” and “patch version”. Generally speaking, changes
to the numbers are less significant as you go to the right, i.e. an increase in the
major version number indicates that more has changed than an increase in the minor
version number.
However, the semantic versioning specification actually has stricter requirements than this, namely that you should increment:
- The major version when you make incompatible changes
- The minor version when you add functionality in a backwards compatible manner
- The patch version when you make backwards compatible bug fixes
While this degree of precision may not be required for any of your own projects, it is a good convention to stick to nonetheless as other developers will probably assume that this is what you are using.
Let’s add a proper version tag to the recipe repository. Give the first commit to the
repository (in mine this is 745fb8b) the tag v0.0.1, which is often used as the
first tagged release for a project. (Another common convention is to indicate that the
software is still experimental by giving it a major version number of zero.)
git tag v0.0.1 745fb8b
Verify that the tag has been added:
git tag
v0.0.1
Now your repository has a proper version tag. Next, let’s push this tag to GitHub so the rest of the world can see it.
Pushing your tags and publishing a release
To push your tags to GitHub, do the following:
git push --tags
You should see something like this:
Total 0 (delta 0), reused 0 (delta 0), pack-reused 0
To https://github.com/alexdewar/recipe.git
 * [new tag]         v0.0.1 -> v0.0.1
Now open your browser and go to the GitHub page for your recipe repository (see the link in the command output). Mine is here, for example.
If you look in the right-hand pane, under “Releases”, you should now see “1 tags”:
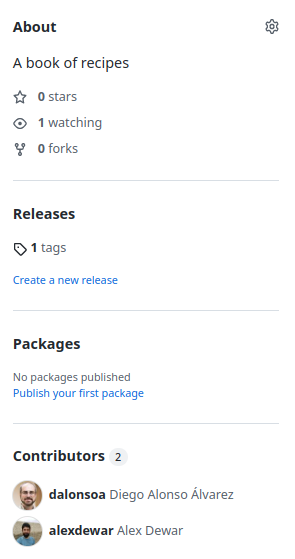
This refers to the v0.0.1 tag you just pushed. (If there are two tags, you may have
forgotten to delete the tasty tag, which doesn’t matter much.)
Under “1 tags”, there is a link entitled “Create a new release”. Click it and you should see something like the following:
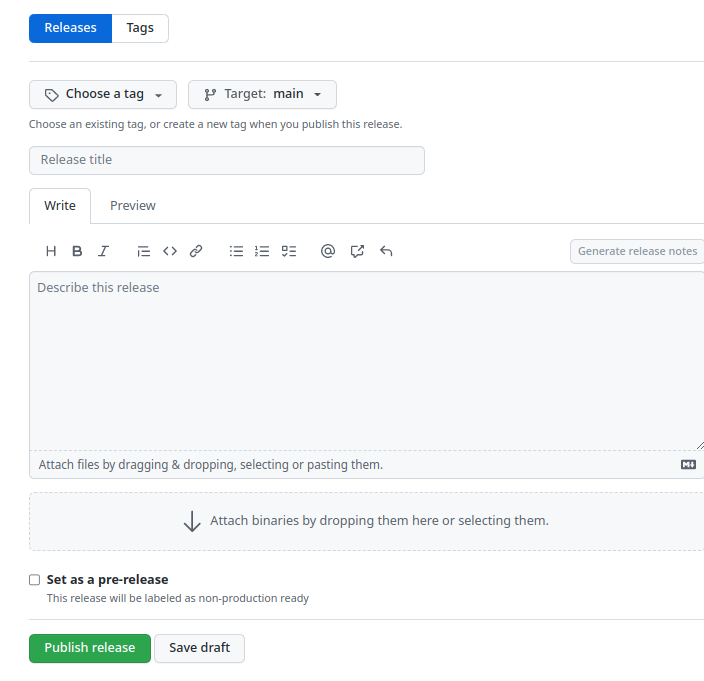
Click “Choose a tag” then select your tag “v0.0.1” from the dropdown list:
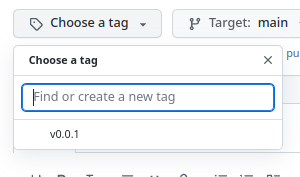
For the release title, you can just put “v0.0.1” again. Then add a description of your
choosing. (You can check the “Set as pre-release” box if you want to indicate to your
users that the recipe isn’t production ready.) Note that there is another field: “Attach
binaries”. We won’t be using this now, but if you did have a compiled version of your
software (e.g. as an .exe file), this is where you could upload it.
When you’re finished, click “Publish release”:
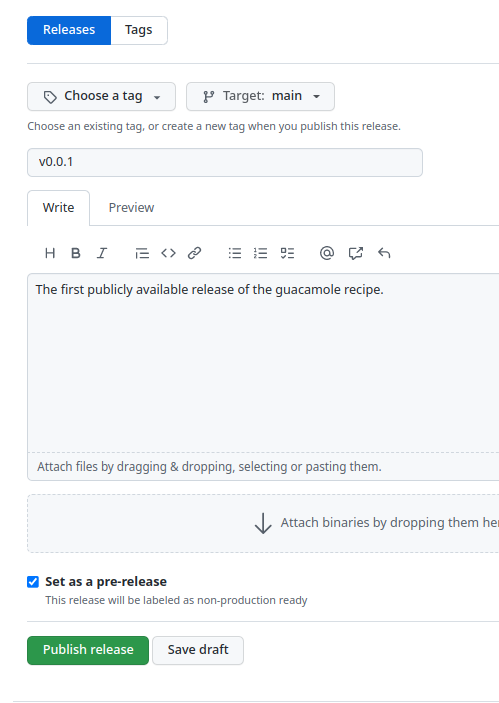
Now you should be redirected to a page that looks like this:
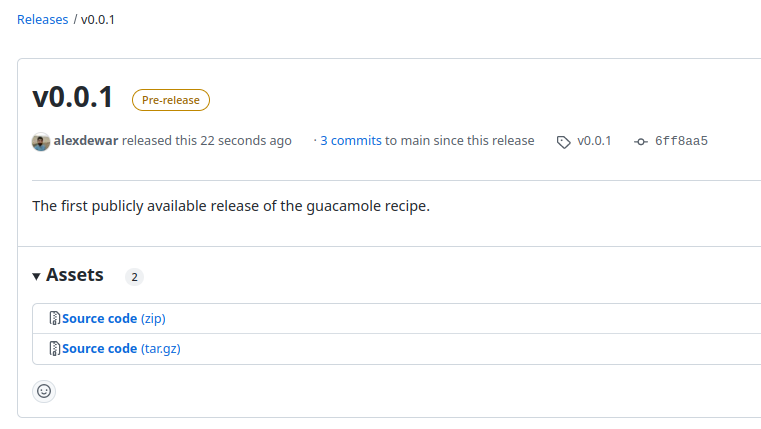
Congratulations, you have made your first release! You can share the link to this page with others if you want to notify them of the release. Alternatively, users can find your release from the repo’s main page by clicking on “Releases”.
Exercise: Publish another release
Now try creating another release corresponding to a newer version of the recipe, following the same steps you did for
v0.0.1.Your first task will be to choose a sensible version number for the release, using semantic versioning. This is necessarily a bit subjective, but you should be able to justify your decision 🙂.
End by pushing the tag to GitHub and issuing another release, with an appropriate description.
Key Points
A version of your code with a release number (e.g. v13.4.2) is referred to as a release
A version of your code represented by a commit hash (e.g. 047e4fe) is just referred to as a commit
Publishing a release can be a good way to bundle features and ensure your users use a specific version of your code
git tagallows you to give a commit a human-readable name, such as a version numberSemantic versioning is a common convention for conveying to your users what a new version number means
Tags need to be explicitly pushed to remotes with
git push --tagsYou can use a tag as the basis for a release on GitHub