Security recommendations
Table of contents
- Security recommendations
- Authentication
- Role-Based Access Control (RBAC)
- ✅ Minimum: Limit access to approved Imperial staff, students and third parties
- ✅ Minimum: Ensure privileged roles such as admin and maintainer are restricted
- ⭐ Recommended: Only add organisation members to repositories not outside collaborators
- ⭐ Recommended: Use GitHub Teams for assigning permissions
- 🏆 Advanced: Use a codeowners file to define who is responsible for certain code in a repository
- Dependency Management
- Managing Secrets
- Branch Protection Rules
- Further reading
This page outlines recommendations for teams to follow when using GitHub to develop software. The recommendations are split into three different categories:
✅ Minimum - These are the baseline security controls that should be implemented by all teams. These help protect against common threats and are fairly easy to implement. They should be implemented for all projects regardless of size or risk level.
⭐ Recommended - These are additional security controls to be applied on top of the minimum controls. If you’re working on a project that is sensitive or supports critical business services, you should be implementing these in your project.
🏆 Advanced - These are advanced security controls to be implemented by mature teams for the most security-conscious projects. They should be implemented once both the minimum and recommended requirements are in place.
Teams should be applying the minimum security controls to all projects. The recommended and advanced security controls are circumstantial and depend on the nature of the project. Teams should aim to implement these only if applicable.
Authentication
✅ Minimum: Enable MFA for your GitHub account
Why it matters
Using multi-factor authentication (MFA), also known as two-factor authentication, helps to secure your GitHub account by adding an extra layer of security beyond just a password. Passwords can be easily stolen through phishing, data breaches or malware. MFA helps prevent unuathorised access in these scenarios. It’s also strongly recommended by GitHub.
How to implement
Follow the instructions at Configuring two-factor authentication.
When choosing a two-factor authentication method, use the time-based one-time password (TOTP) app if possible. This is much more secure than using SMS.
✅ Minimum: Use fine-grained personal access tokens over classic personal access tokens
Why it matters
Classic personal access tokens (PAT) give access to all repositories a user account has access to. This increases the blast radius if the PAT is compromised. They also have less granular permissions compared to fine-grained PATs. Fine-grained PATs allow you to specify exactly which repositories, organisations and permissions the token can access. This limits the blast radius in the event the PAT is compromised. They also benefit from improved auditing and management.
How to implement
Follow the instructions at Creating a fine-grained personal access token. When creating the PAT, follow the best practises below:
- Limit PAT access to only specific repositories. Avoid giving the PAT access to all repositories.
- Assign on the necessary permissions. The GitHub REST API documentation provides the necessary permissions for each endpoint.
- Set the shortest expiration date possible.
- Do not store the PAT in code or config files. Store it in a Password Manager or as a GitHub Action secret.
At the time of writing, not all GitHub resources support fine-grained PATs. If the resource you want to access doesn’t support fine-grained PATs, use a classic PAT until support is added.
🏆 Advanced: For automations, use a GitHub App for authentication
Why it matters
When running automations within GitHub such as CI/CD, integrations, and administration tasks, these should run under a non-human identity rather than a human identity. If using a human identity and the user left leave Imperial, their access would be removed and the automation would cease to function.
A common approach for running automations under a non-human identity is to create a bot account on GitHub. This is effectively a GitHub account that isn’t tied to a particular user but a team. It has an email and password that is shared across a team allowing multiple users to manage the account. A PAT is created under the account and is used for running the automation. This approach is reasonable but has a number of limitations:
- PATs are long-lived (unless manually rotated) and, if leaked, can be misused until revoked
- PATs expire after a set length of time and need regenerating. If the PAT is not regenerated, automations may stop working.
- They can be difficult to maintain at scale across multiple repositories and organisations.
- Making changes often requires logging into the bot account, which can be cumbersome.
GitHub Apps reduce these limitations by providing a secure and scalable method for running automations. GitHub Apps can act independently of a user. Rather than creating a GitHub account, you create a GitHub App and grant the app access to the required resources. For authentication, the GitHub App uses a private key to generate a short-lived JSON Web Token (JWT) and installation access token. These can then be used to authenticate requests to the API. This removes the need to regularly regenerate PATs and manage non-human GitHub accounts.
How to implement
Review the instructions at Creating GitHub apps.
GitHub Apps must be created and managed by an organisation owner. For that reason, they’re only recommended for advanced use cases.
Role-Based Access Control (RBAC)
✅ Minimum: Limit access to approved Imperial staff, students and third parties
Why it matters
Limiting access to approved Imperial staff, students, and third parties helps ensure that sensitive systems and data are only accessible to individuals who have a legitimate reason to use them. This reduces the risk of accidental data exposure, insider threats, and unauthorised access by former employees or external actors. By enforcing strict access boundaries, Imperial can maintain accountability, comply with data protection regulations, and uphold the integrity of its digital infrastructure.
How to implement
Imperial staff and students should first be added as a member of the ImperialCollegeLondon organisation. Instructions on how to do this can be found at gaining access to the Imperial College London organisation. Once they’re a member of the organisation, they can be added to the repository under the Collaborators and teams tab in the repository settings.
Other 3rd parties (e.g. contractors, consultants and researchers) should also be added as a member of the organisation if they have an Imperial account. If they don’t have an Imperial account, they can be added as an outside collaborator following the instructions at Add an outside collaborator to my GitHub repository.
When the user no longer requires access to the repository, they should be removed. This ensures the principal of least privilege.
✅ Minimum: Ensure privileged roles such as admin and maintainer are restricted
Why it matters
Privileged roles such as Admin and Maintainer have elevated access that can significantly impact the security, stability, and integrity of systems and codebases. If these roles are assigned too broadly or without oversight, they increase the risk of accidental misconfigurations, unauthorised changes, or malicious actions. Restricting privileged roles to only those who genuinely need them helps enforce the principle of least privilege, reduces the attack surface, and ensures that critical operations are performed by trusted and accountable individuals.
How to implement
- Carefully review the permissions for each role at Repository roles for an organisation and select the most appropriate role for the user.
- Limit Admin access to only a handful of people who should be able to perform destructive actions such as deleting a repository.
- Limit Maintainer access to only users who need to manage the repository settings.
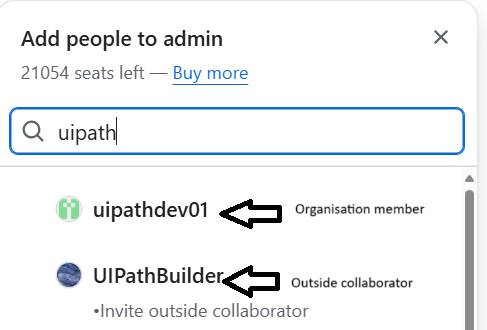
⭐ Recommended: Only add organisation members to repositories not outside collaborators
Why it matters
When using outside collaborators, the GitHub account isn’t tied to an Imperial account. This means MFA isn’t enforced and we don’t have an email address for the user. This reduces accountability and makes it harder to contact the individual. If an outside collaborator leaves a project, their access may not be revoked promptly as it is not managed through Imperial’s identity system.
Restricting repository access to organisation members rather than using outside collaborators ensures that only individuals with a valid Imperial account can access internal resources. Because organisation membership is tied to SAML Single Sign-On (SSO), access is automatically revoked when a user’s Imperial account is deactivated (e.g. when they leave the university). This provides a strong access control mechanism, reduces the risk of lingering or orphaned accounts, and ensures that access is always aligned with current institutional affiliation and identity verification.
How to implement
When adding a user to a repository, ensure the account you’re adding is a member of the organisation and not an outside collaborator.
If the user isn’t a member of the organisation, they should first be added by following the instructions at gaining access to the Imperial College London organisation. If they don’t have an Imperial account, one should be created for them.
⭐ Recommended: Use GitHub Teams for assigning permissions
Why it matters
Using GitHub Teams to assign repository permissions simplifies access management, improves visibility, and ensures consistency across projects. Instead of managing individual user access on each repository, teams allow you to group users by role or function (e.g., developers, reviewers, maintainers) and assign permissions at scale. This makes it easier to onboard new members, audit access, and enforce the principle of least privilege. It also aligns well with organisational structures and reduces the risk of misconfigured or forgotten permissions.
How to implement
Create teams that reflect functional roles or responsibilities. For example:
| Team Name | Users | GitHub Role |
|---|---|---|
| ProjectA - Developers | Alice, Bob, Charlie | Write |
| ProjectA - Product Owners | Diana, Eric | Read |
| ProjectA - Maintainers | Frank | Maintain |
| ProjectA - Tech Leads | Grace, Henry | Admin |
Once the teams have been created, they can be added to a repository and given a role. This also helps repository navigation as users can view all repositories a team has access to under the team view.
🏆 Advanced: Use a codeowners file to define who is responsible for certain code in a repository
Why it matters
A CODEOWNERS file defines who is responsible for specific parts of a codebase, ensuring that the right people are automatically requested for review when changes are made. This improves accountability, speeds up the review process, and helps maintain code quality by involving subject matter experts. It also reduces the risk of unreviewed or misreviewed changes being merged, especially in large or multi-team repositories. By clearly assigning ownership, teams can enforce standards, and streamline collaboration.
How to implement
-
Decide who is responsible for each part of the codebase. For example, you may have a frontend and backend within the same repository. TeamA could be responsible for the frontend and TeamB for the backend.
-
Follow the instructions at About code owners to create a codeowners file.
-
Create a new branch ruleset under repository settings and ensure the following options are enabled:

-
When a new pull request changes code that matches a pattern in the
CODEOWNERSfile, those users/teams are automatically requested as reviewers.
Dependency Management
✅ Minimum: Enable Dependabot Alerts
Why it matters
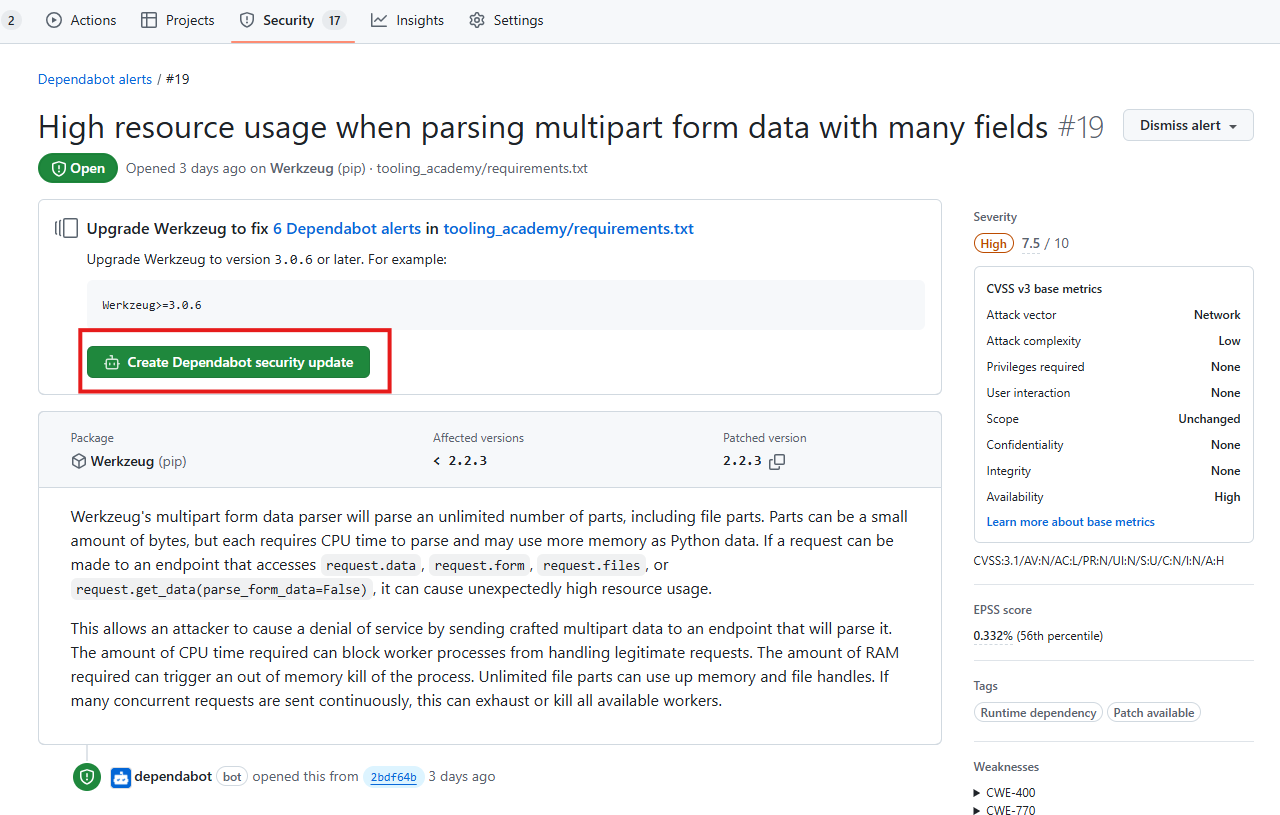
GitHub Dependabot is a security feature that helps keep the software dependencies in your project up-to-date. The National Cyber Security Centre recommends applying updates as soon as possible, and ideally automatically. Dependabot can help with this by monitoring the dependencies in your repository and raising alerts for vulnerabilities. If a vulnerability is identified, it can automatically raise a pull request to update the dependency. It can also raise pull requests every time a new version of a dependency is available.
At a minimum, Dependabot alerts should be enabled which will notify you of any vulnerabilities. You then have the option of allowing Dependabot to create a pull request with a fix:
How to implement
-
Check your project uses a package manager that is supported by Dependabot. Dependabot supports a variety of package managers. These include Gradle, Maven, pip, npm, NuGet and many more. You can view a full list at Dependabot supported ecosystems and repositories.
-
Follow the instructions at Managing Dependabot alerts for you repository to turn on Dependabot alerts. Once enabled, you can view vulnerabilities under the Security tab.
⭐ Recommended: Enable Automatic Dependency Updates
Why it matters
Automatically updating dependencies ensures your project stays current with the latest security patches and improvements, reducing manual effort and the risk of outdated packages.
Rather than manually upgrading package versions, Dependabot does this for you and automatically creates a pull request targeting your default branch. The behaviour of Dependabot can be heavily customised according to the project’s needs.
How to implement
Follow the instructions at Enabling Dependabot version updates.
🏆 Advanced: Consider Renovate if experiencing limitations with Dependabot
Why it matters
While Dependabot is effective for many common dependency updates, it has limitations - particularly with monorepos, custom registries, or less common ecosystems. Renovate offers greater flexibility and configurability, making it a powerful alternative when Dependabot cannot fully meet your project’s needs. It supports a wider range of package managers, allows for fine-grained scheduling and grouping of updates, and can be tailored to complex workflows. Using Renovate ensures that all dependencies, not just the ones Dependabot supports, are kept up to date - reducing security risks and maintenance overhead.
Renovate is an open-source project and can be installed on repositories for free. It has two main hosting methods - GitHub App (hosted by mend.io - the company behind Renovate) or self-hosted. If you’re hesitant of allowing mend.io access to your repository, Imperial provide a self-hosted instance of Renovate. To use this self-hosted instance, create an issue under the self-hosted-renovate repository and the GitHub Admins will assist you in setting it up.
How to implement
- Choose whether to use the GitHub App (hosted by mend.io) or self-hosted version of Renovate.
- Checkout Renovate’s reading list to understand how it works and key concepts.
- Configure Renovate as per the options available at Renovate configuration overview.
Managing Secrets
Managing secrets is covered in more detail under Secrets management.
✅ Minimum: Do not store secrets in code or config files
Why it matters
In GitHub’s 2024 Octoverse report, 39 million secret leaks were detected in GitHub repositories. According to the IBM Cost of Data Breach Report (2024), breaches involving compromised credentials cost organisations an average of $4.88 million per incident. This is a 10% increase from the previous year.
Good secrets management is important as it helps organisations prevent security threats that may arise through exposed credentials. If exposed, secrets can grant adversaries unauthorised access to an organisation’s code base, databases and other sensitive data. This is of particular concern in public repositories where attackers can, and do, regularly scan for leaked secrets.
How to implement
- Before creating a commit, read through the proposed changes and check for any secrets.
- Use a dedicated secrets management solution to store and access secrets securely. This could be Azure Key Vault, GitHub Actions secrets or a Password Manager.
⭐ Recommended: Use code scanning tools to identify and block secrets from being committed
Why it matters
Code scanning tools use pattern matching to detect secrets such as API keys, passwords, and tokens. This helps prevent sensitive information from being accidentally committed to version control. These tools act as a safety net, catching mistakes before they become security incidents. By scanning code in real time (pre-commit) or during CI/CD workflows, they reduce the risk of credential leaks, unauthorised access, and compliance violations.
They also support incident response by alerting teams to exposures early, allowing for quick remediation and secret rotation. Remediating a secret after it’s been pushed to GitHub is much more labour intensive then catching it pre-commit. Implementing secret scanning is a proactive and automated way to improve security for a project.
How to implement
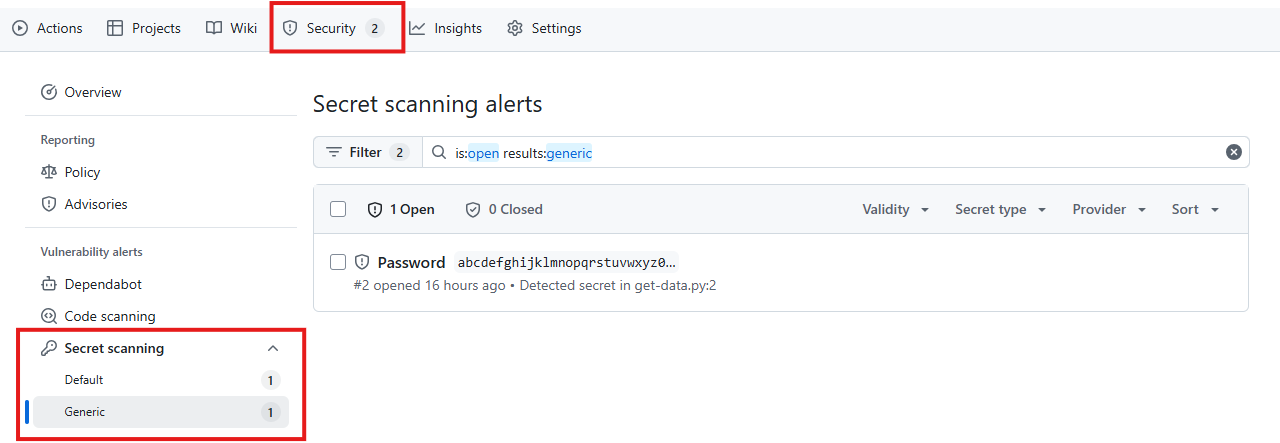
For public repositories, you should enable GitHub Secret Scanning. This is available free of charge for public repositories. To enable secrets scanning, navigate to the Advanced Security tab within the repository settings and enable the following options:
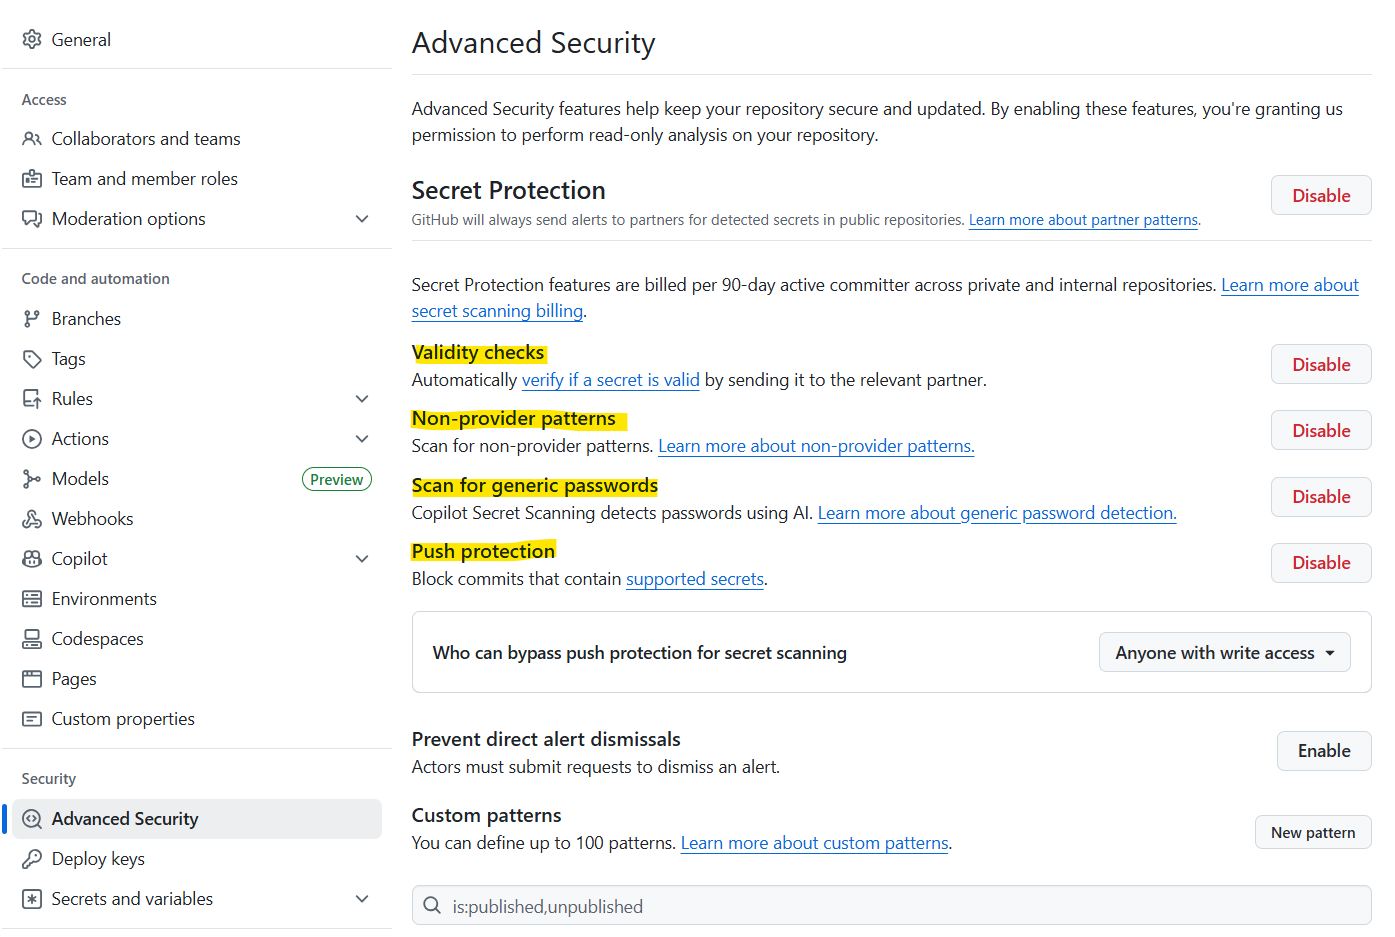
You’ll then be able to view detected secrets under the Security tab.
For private and internal repositories, you can use the open-source projects TruffleHog or detect-secrets to scan for secrets. This is recommended as Imperial is not licensed for GitHub Secrets Scanning in private and internal repositories. Unlike GitHub Secret Scanning, Trufflehog and detect-secrets do not support pre-receive hooks (where commits containing secrets are rejected by the git server). For this reason, it’s recommended to setup pre-commit hooks for Trufflehog or pre-commit hooks for detect-secrets to block commits that contain secrets.
Using secret scanning tools is not a silver bullet. Not all secrets will be detected by these tools. It’s important to still manually check staged files for secrets before committing them.
Branch Protection Rules
✅ Minimum: Require a pull request before merging
Why it matters
Within GitHub, the default branch (typically called main) is the source of truth for production ready code. When you want to edit your production code, you typically checkout a new feature branch, modify your code then merge the feature branch back into the main branch.
As the main branch is considered the production branch, it should be protected. This ensures only code that has been reviewed, tested and approved is merged. This reduces the risk of introducing bugs, vulnerabilities or accidental deletions. By preventing direct pushes, you create a safer, more controlled development workflow that supports collaboration and compliance. It effectively adds a gate before code is merged into the main branch, ready for production.
How to implement
Create a new branch ruleset (or use an existing one), targeting the default branch, and ensure the following options are enabled: 
⭐ Recommended: Require a peer review before merging
Why it matters
Requiring a pull request before merging is a good first step. However, it doesn’t enforce separation of duties. The person who created the pull request can also merge it. This may not matter for less critical business services but could be too much control for one person in critical services. Having a single person able to modify and deploy code (without any involvement from other persons or automated processes) could lead to misuse.
This risk can be mitigated by requiring a peer review (aka code review) before pull requests are merged. This ensures a second person has reviewed and verified the code before it’s merged into the main branch. This can help:
- Improve code quality - reviewers can help catch bugs, logic errors or inconsistencies (e.g. not following coding standards).
- Encourage thoughtful discussion - knowing that code will be reviewed encourages developers to write cleaner, more concise code. It also encourages collaboration and shared thinking.
- Supports accountability and traceability - creates a clear audit trail of who reviewed and approached changes.
Peer reviews can be particularly useful in DevOps environments where teams moves fast because it provides a lightweight, collaborative way to ensure code quality, security and compliance without introducing significant delays. It can also reduce the need for formal CAB processes as changes are reviewed and approved by those closest to the work, who better understand the impact.
How to implement
Create a new branch ruleset (or use an existing one), targeting the default branch, and ensure the following options are enabled: 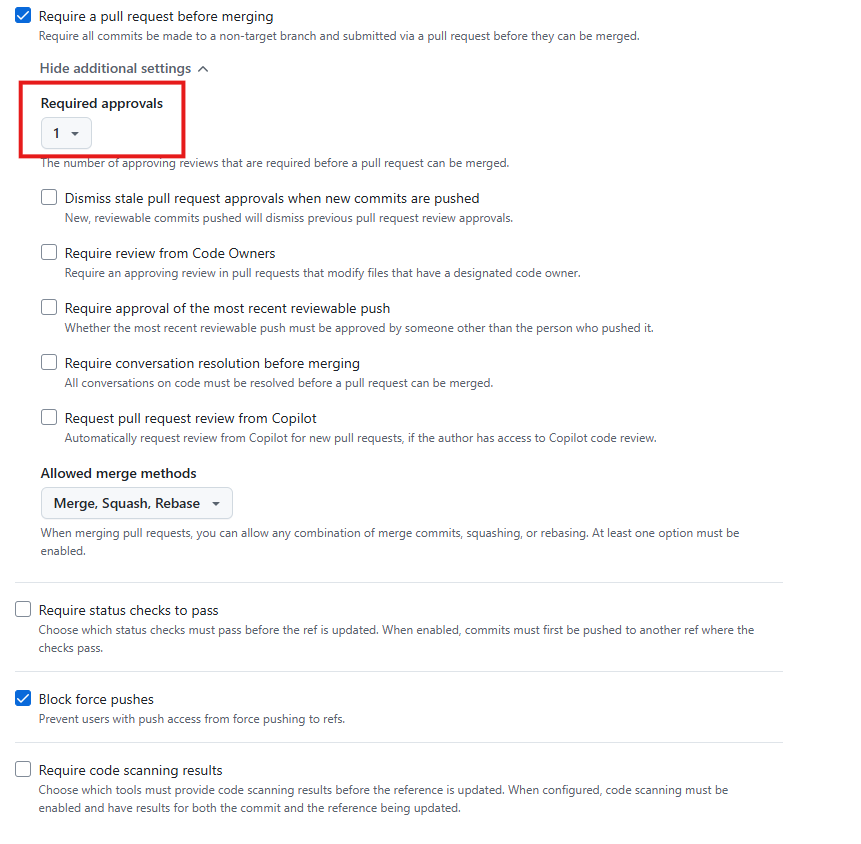
⭐ Recommended: Require status checks to pass before merging
Why it matters
Status checks are automated tests or processes (such as unit tests, linting, security scans, or build verifications) that run on pull requests before changes are merged into a protected branch. Requiring status checks to pass before merging ensures that only code meeting defined quality, security, and operational standards is integrated into the main branch. This reduces the risk of introducing bugs, vulnerabilities, or breaking changes, and helps maintain a consistent, reliable codebase. Automated checks provide immediate feedback to developers and help catch issues early in the development lifecycle. Enforcing passing status checks is a key practice for maintaining high-quality, production-ready software.
How to implement
Requiring status checks to pass before merging is only possible if you’re running checks as part of your CI/CD process. For example, you may have a GitHub Actions workflow that runs when a new pull request is opened targeting the main branch. This workflow could include a set of unit tests. You can require a status check (i.e. the unit tests) to pass before the pull request can be merged.
To do this, Create a new branch ruleset (or use an existing one), targeting the default branch, and ensure the following options are enabled: 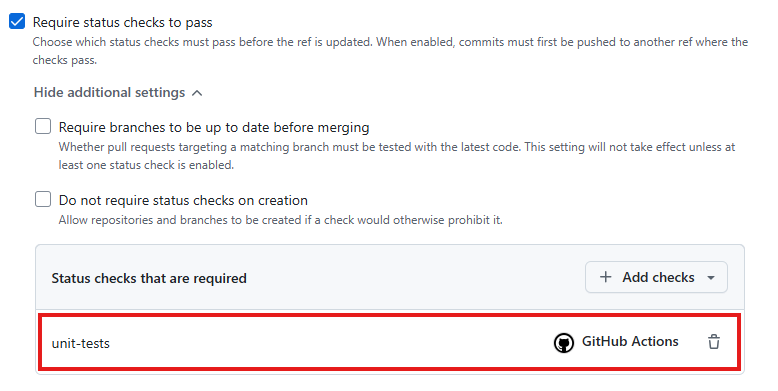
Further reading
Page last modified: 1 Aug 2025.