From MRI to Mesh: Finite Element Brain Model Creation
This exemplar provides a reproducible workflow for structural magnetic resonance (MR) images to be transformed into a finite element brain mesh in LS-DYNA keyword (.k) format. It combines image preprocessing, segmentation and meshing in one clear MRI-to-mesh workflow. It also contains optional post-processing to enable a downstream FE simulations.
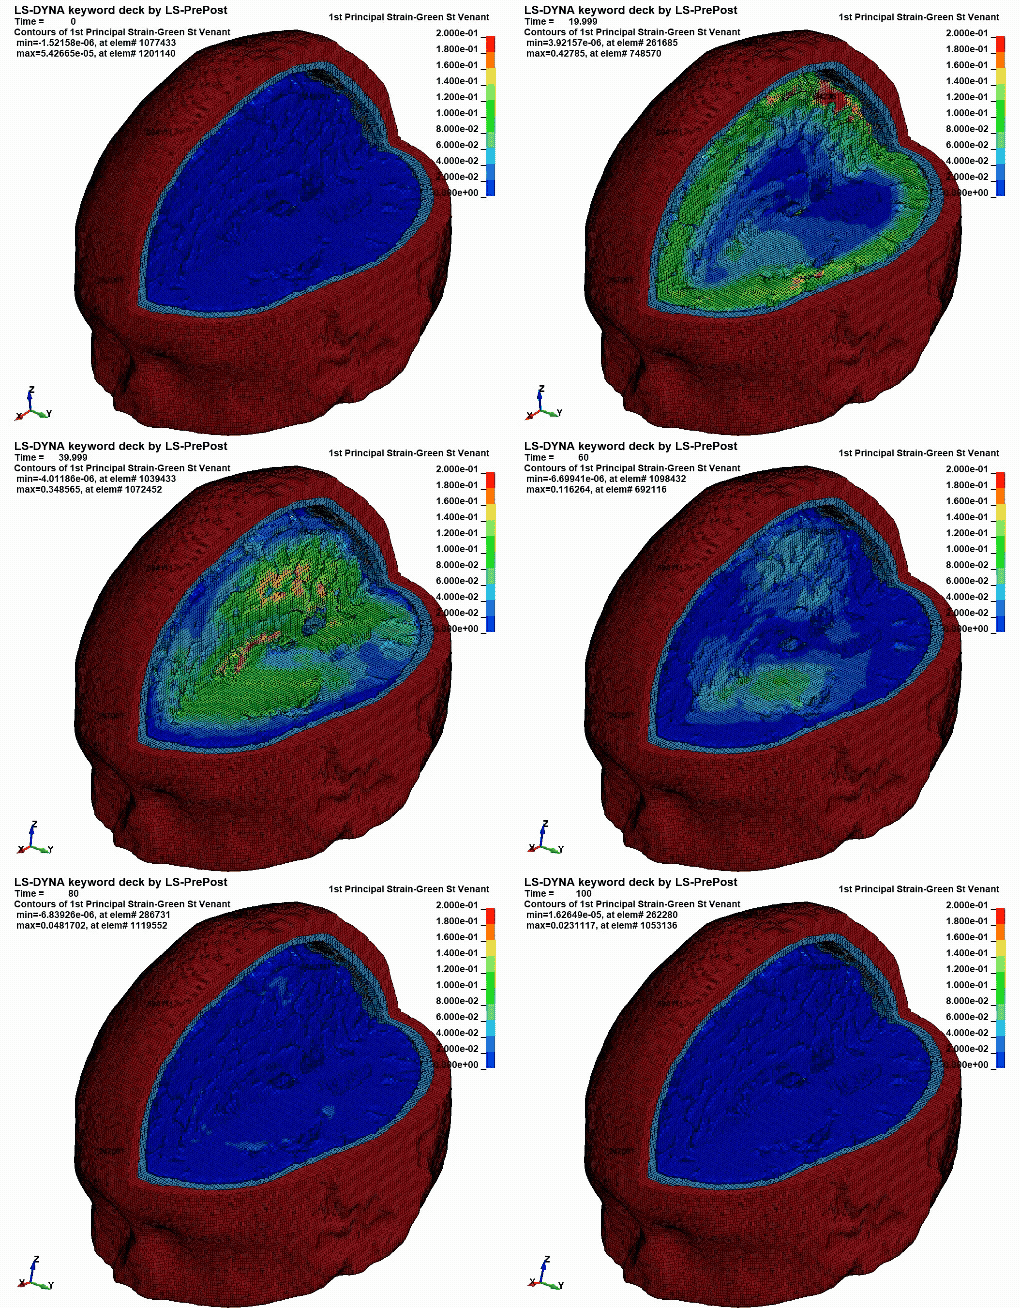
This brain mesh creation pipeline was scientifically developed by Dr Mazdak Ghajari, Dr Harry Duckworth, Mr Vahid Darvish, and Ms Emily Chan, all in the HEAD Lab at Imperial College London.
This exemplar was developed at Imperial College London by Ms Emily Chan in collaboration with Dr Miruna Serina from Research Software Engineering and Dr Jianliang Gao from Research Computing & Data Science at the Early Career Researcher Institute.
With suitable MRI-derived inputs, this pipeline allows users to turn an individual's brain anatomy into a subject-specific finite element mesh.
Disciplinary Background 🔬
In brain biomechanics research, subject-specific anatomical models are often generated from structural MRI data and converted into finite element meshes that can be used to simulate tissue deformation under mechanical loading. These models are widely used traumatic brain injury (TBI) research, where understanding how anatomy influences brain strain can help interpret injury mechanisms and improve predictive modelling. At the HEAD Lab, researchers have used the mesh generation pipeline to generate hundreds of brain FE models, enabling large-scale FE simulations in TBI research, particularly how anatomical differences of the brain affects injury.
Learning Outcomes 🎓
After completing this exemplar, you will be able to:
- Process and visualise neuroimaging data using FSL, a useful open-source neuroimaging software library.
- Interpret the structure of an LS-DYNA mesh file, understand how nodes, elements, parts, and model definitions.
- Generate a subject-specific volumetric finite element brain mesh from structural MRI-derived inputs.
- (Optional) Understand the basic requirements for setting up an LS-DYNA simulation, including the role of supporting files needed alongside the generated mesh.
Prerequisites ✅
Academic 📚
- Basic familiarity with Python, including using libaries and calling functions.
- Basic familiarity with simple Bash commands in Jupyter notebook environment, such as navigating directories, writing shell commands, and handling files (e.g.
cd,cp,echo). - A general awareness of finite element modelling is helpful, but not required.
System 💻
- Python 3.9 and above
- Jupyter Notebook
- FSL v6.0.7 and above, installed (requires ~20GB disk space) and configured properly
- Sufficient disk space (estimate 2GB) for intermediate image files, and generated meshes
- Ls-PrePost for visualising output brain mesh
Software Tools 🛠️
- Programming language: Python, with some Bash commands used within Jupyter notebooks.
- LS-Prepost: a GUI tool for pre- and post-processing of finite element models.
- FSL - FMRIB Software Library: a library for brain imaging data analysis.
FSL must be correctly configured before running the notebooks. In particular, the FSLDIR environment variable must be set, and the FSL command-line tools must be available from your terminal.
After installing FSL, follow the official FSL configuration instructions. For bash or zsh, this usually means adding the following lines to your shell configuration file, such as ~/.bashrc, ~/.bash_profile, or ~/.zshrc:
# FSL Setup
FSLDIR=~/fsl
PATH=${FSLDIR}/share/fsl/bin:${PATH}
export FSLDIR PATH
. ${FSLDIR}/etc/fslconf/fsl.sh
Getting Started 🚀
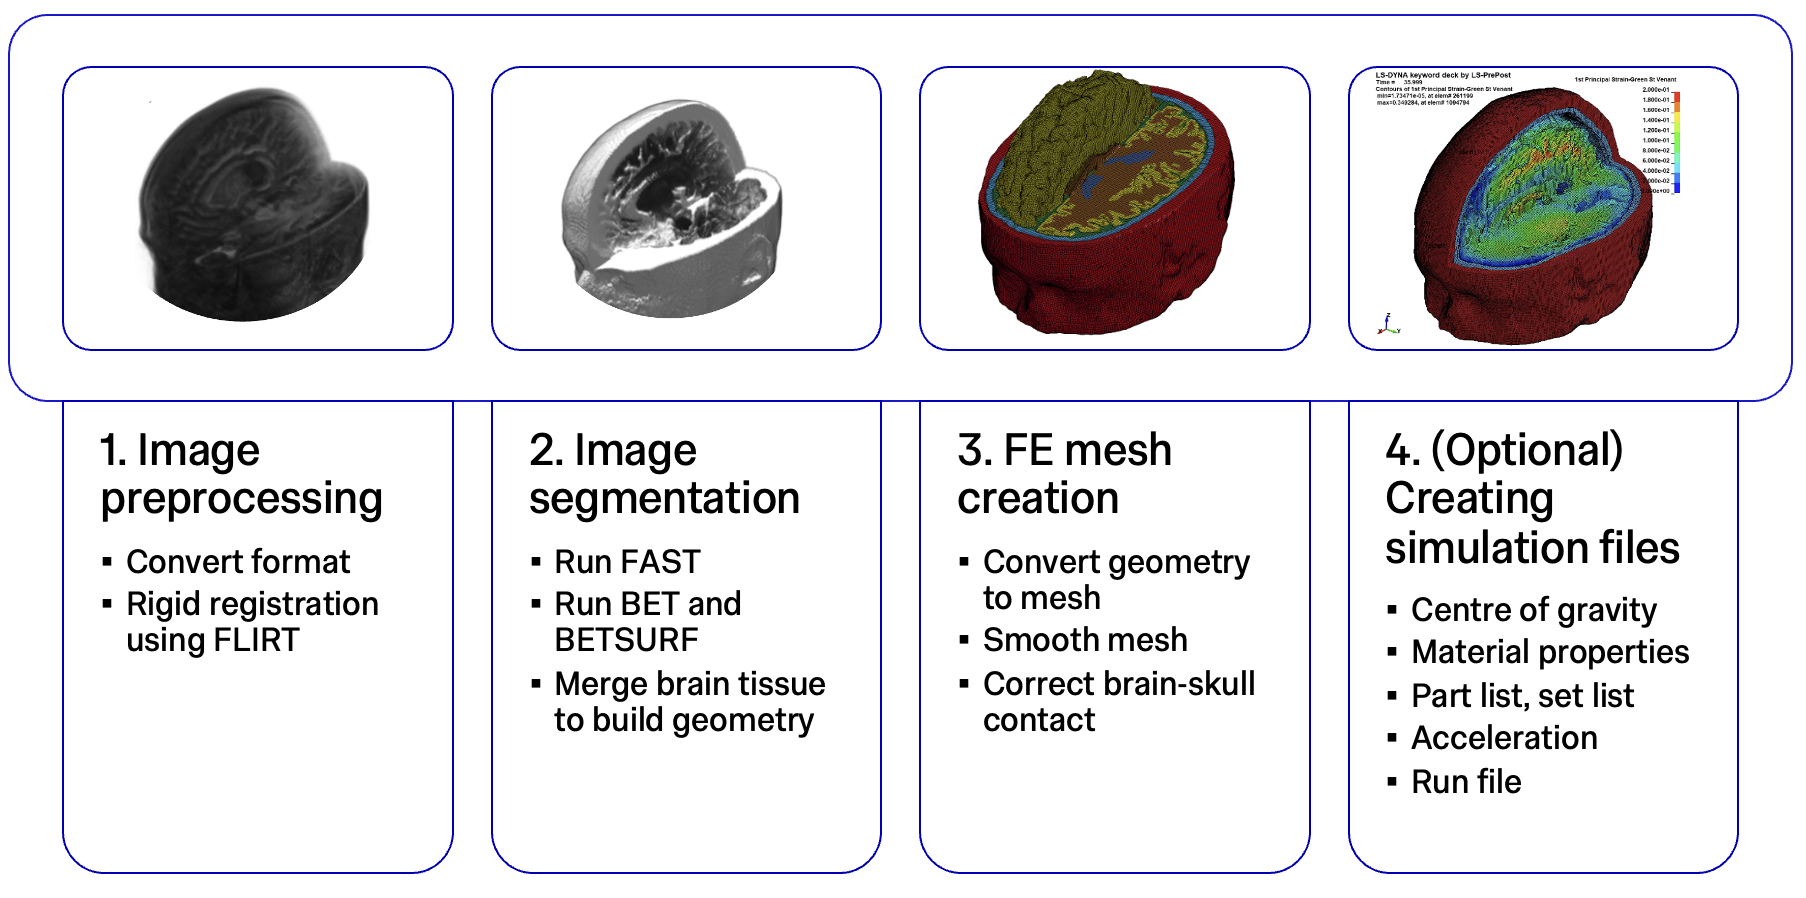
The main step-by-step materials are stored together in docs/. This folder contains both the explanatory Markdown pages and the executable notebooks used in the MRI-to-mesh pipeline.
- Fulfil the Prerequisites.
- Follow
01_Introduction.mdfor background information, required inputs, and the expected folder structure. - Run
02_ImageProcess.ipynbto complete image processing and image segmentation. - Follow
03_FSLeyes.mdto inspect selected image-processing outputs in FSLeyes and check whether the segmentation worked as expected. - Run
04_MeshCreation.ipynbto generate, smooth, and refine the finite element brain mesh. - Follow
05_VisualiseMesh.mdto inspect the generated brain mesh in LS-PrePost by rotating, slicing, and checking the model geometry. - Optional: follow
06_Simulation.mdto prepare supporting files for downstream finite element simulation.
Apart from running the notebooks in your local environment, they can also be run directly in GitHub Codespaces using the instructions in Try code on GitHub with Codespaces.
Try the notebooks on GitHub Codespaces
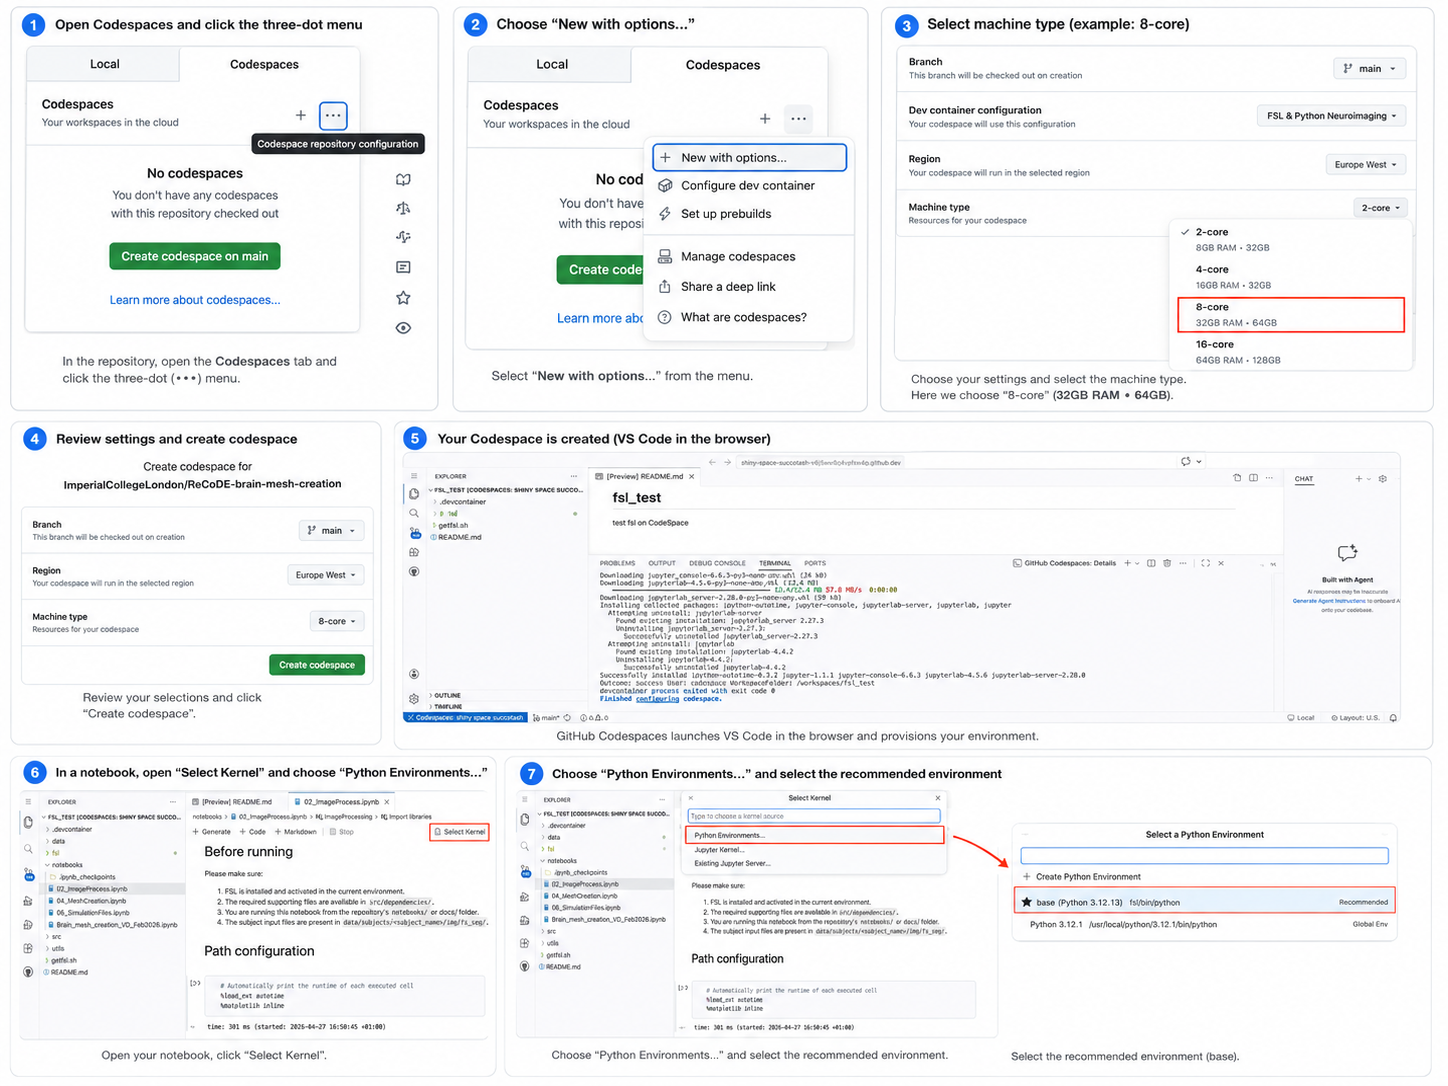
You can run the notebooks directly in GitHub Codespaces without setting up the environment locally. The steps are shown in the image below.
- In the repository, click the green Code button, open the Codespaces tab, and click the three-dot "..."* menu.
- Select New with options... from the menu.
- Under Machine type, choose 8-core, 32 GB RAM, 64 GB storage or higher (this requires signing up to GitHub Student Developer Pack if you have not already done so).
- Review the selected settings, then click Create codespace.
- Wait for GitHub Codespaces to launch VS Code in the browser and finish configuring the environment.
- Open the notebook you want to run from the
notebooks/. Click Select Kernel, then choose Python Environments.... - Select the Recommended Python environment, for example the
baseenvironment, to run the notebook.
View neuroimages in Codespaces
There are two options available to view neuroimages.
- Option1 (maybe slow) : Use Trame to view images
- Find trame_nii_viewer.py and modify the line (16)
/workspaces/ReCoDE-brain-mesh-creation/data/subjects/avg-male/tmpto the imaging files directory you want to view. Then save the updated trame_nii_viewer.py. -
in a Codespace terminal, run the following command:
A new tab will be opened on your web browser to view images. (be aware: if it is slow to load images, please refresh the Trame viewer tab)fslpython trame_nii_viewer.py -
Option2 (fast): Use
fsleyes rendercommand to view images -
In Codespace terminal, run the following command:
fsleyes render --outfile output_T1.png data/subjects/sub0045/img/fs_seg/T1.nii.gz -cm brain_colours_nih- Modify the output filename
output_T1.pngas needed. This will be the exported PNG image. - Modify the input file path
data/subjects/sub0045/img/fs_seg/T1.nii.gzi f you want to render another NIfTI file. - Modify
-cm brain_colours_nihif you want to use a different colourmap. More colourmap codes can be found at fsleyes command
- Modify the output filename
Project Structure 🗂️
.
├── .devcontainer/                       # GitHub Codespaces configuration
│   ├── devcontainer.json
│   └── install_fsl.sh                   # Installs FSL in Codespaces
│
├── .github/
│   └── workflows/                       # GitHub Actions for documentation and link checking
│
├── data/
│   └── subjects/
│       ├── sub0045/                     # Minimal example subject used by the workflow
│       │   └── img/
│       │       └── fs_seg/              # MRI and FreeSurfer-derived segmentation inputs
│       └── sub0045_example/             # Completed example subject with reference outputs
│
├── docs/                                # Documentation pages and executable workflow notebooks
│   ├── index.md                         # Documentation landing page
│   ├── 01_Introduction.md               # Background, inputs, and expected folder structure
│   ├── 02_ImageProcess.ipynb            # MRI preprocessing and segmentation workflow
│   ├── 03_FSLeyes.md                    # Image inspection guide
│   ├── 04_MeshCreation.ipynb            # Mesh generation, smoothing, and refinement workflow
│   ├── 05_VisualiseMesh.md              # Mesh visualisation in LS-PrePost
│   ├── 06_Simulation.md                 # Supporting files for downstream FE simulation
│   └── assets/                          # Images, GIFs, and media used in the documentation
│
├── src/
│   ├── brain_mesh_creation/              # Python package for mesh creation utilities
│   │   ├── __init__.py
│   │   ├── bmctk.py
│   │   └── mesh_utils.py
│   │
│   └── dependencies/                     # Non-Python files used by the workflow
│       ├── MNI152_T1_1mm_brain.nii.gz    # Reference image used by the pipeline
│       ├── rs/                           # Mesh smoothing tools and lookup table
│       │   ├── MeshSmoothing_02.cpp
│       │   ├── look_up_table.txt
│       │   ├── mesh_smoother_linux_x86_64
│       │   ├── mesh_smoother_macos_arm64
│       │   ├── mesh_smoother_macos_x86_64
│       │   └── mesh_smoother_windows_x86_64.exe
│       └── sim/                          # Example files for downstream FE simulation setup
│           ├── run_simulation.k           # Master include file for assembling a simulation deck
│           ├── material_properties.k      # Example material and section definitions
│           ├── part_list_full.k           # Part definitions linking mesh regions to materials
│           ├── set_list.k                 # Example part/set definitions for simulation setup
│           ├── centre_of_gravity.k        # Reference point for applying head kinematics
│           └── acceleration_rugby1.k      # Example acceleration loading file
│
├── utils/
│   └── embed_images.py                   # Utility script for documentation image handling
│
├── trame_nii_viewer.py                   # Browser-based NIfTI viewer for Codespaces
├── mkdocs.yml                            # MkDocs documentation-site configuration
├── pyproject.toml                        # Python project metadata
├── requirements.txt                      # Python dependencies
├── Makefile                              # Convenience commands
├── LICENSE.md                            # Project licence
└── README.md                             # Project overview and usage entry point
The repository includes two versions of the example subject. The workflow uses sub0045 as the minimal runnable example, while sub0045_example provides completed reference outputs for comparison. The src/dependencies/sim/ files are provided only as example supporting files for downstream finite element simulation; they should be reviewed and adapted before use in a validated LS-DYNA simulation.
Roadmap 🗺️
Core 🧩
- Install prerequisites and setup environment
- FSL installation
- LS-Prepost installation
- Image processing and segmentation
- Does the FAST segmentation produce reasonable result?
- Does the BET segmentation produce reasonable result?
- Is the generated geometry file
pre_model.nii.gzlook reasonable in FSLeyes?
- Mesh creation and smoothing
- Does the generated mesh look reasonable in LS-PrePost?
Extensions 🔌
(Requires deeper understanding of finite element analysis)
- Understand the supporting files for FE simulations using the generated mesh
- Material property of the brain
- Centre of gravity of the brain
- Parts and sets of the brain model
- Acceleration, the mechanical loading apply to the brain model
- Run file, the configuration of FE simulation
Best Practice Notes 📝
- During image processing and segmentation steps, regularly check the intermediate outputs using FSLeyes if you are running the project locally, or follow this if you are using with Codespaces.
Estimated Time ⏳
| Task | Estimated time |
|---|---|
| Introduction | 10 min |
| Environment setup | 30 min |
| Image processing | 1 hour |
| Image visualisation | 1 hour |
| Mesh creation | 1 hour |
| Mesh visualisation | 1 hour |
| Extension | 30 min |
| Total Estimated Time | 5 hours |
Citation 📄
Please cite this preprint if you use this repository for your study:
Darvishi V, Chan EY, Duckworth H, Parker TD, Sharp DJ, Ghajari M. PARS: an automated, open-source pipeline for subject-specific finite element head modelling from MRI. bioRxiv. 2026:2026-07.
Licence 📄
This project is licensed under the BSD-3-Clause license.